
Page 263 - METRO CENTER PDF BINDER 1_Neat
P. 263
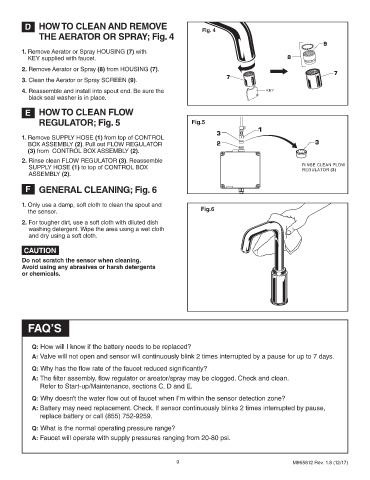
D    HOW TO CLEAN AND REMOVE
                                                                    Fig. 4
              THE AERATOR OR SPRAY; Fig. 4
                                                                                                            9
        1.  Remove Aerator or Spray HOUSING (7) with
          KEY supplied with faucet.                                                             8
        2.  Remove Aerator or Spray (8) from HOUSING (7).                                                       7
                                                                            7
        3.  Clean the Aerator or Spray SCREEN (9).
        4.  Reassemble and install into spout end. Be sure the                           KEY
          black seal washer is in place.

         E    HOW TO CLEAN FLOW

              REGULATOR; Fig. 5                                 Fig.5
                                                                                      1
                                                                         3
        1.  Remove SUPPLY HOSE (1) from top of CONTROL
          BOX ASSEMBLY (2). Pull out FLOW REGULATOR                      2                               3
          (3) from  CONTROL BOX ASSEMBLY (2).
        2.  Rinse clean FLOW REGULATOR (3). Reassemble
          SUPPLY HOSE (1) to top of CONTROL BOX                                                      RINSE CLEAN FLOW
                                                                                                     REGULATOR (3)
          ASSEMBLY (2).
         F    GENERAL CLEANING; Fig. 6

        1.  Only use a damp, soft cloth to clean the spout and
          the sensor.                                               Fig.6
        2.  For tougher dirt, use a soft cloth with diluted dish
          washing detergent. Wipe the area using a wet cloth
          and dry using a soft cloth.

         CAUTION
        Do not scratch the sensor when cleaning.
        Avoid using any abrasives or harsh detergents
        or chemicals.


          FAQ’S


            Q:  How will I know if the battery needs to be replaced?
            A:  Valve will not open and sensor will continuously blink 2 times interrupted by a pause for up to 7 days.

            Q:  Why has the flow rate of the faucet reduced significantly?
            A:  The filter assembly, flow regulator or areator/spray may be clogged. Check and clean.
              Refer to Start-up/Maintenance,  sections C, D and E.

            Q:  Why doesn’t the water flow out of faucet when I’m within the sensor detection zone?
            A:  Battery may need replacement. Check. If sensor continuously blinks 2 times interrupted by pause,
              replace battery  or call (855) 752-9259.

            Q:  What is the normal operating pressure range?
            A:  Faucet will operate with supply pressures ranging from 20-80 psi.


                                                           9                                        M965612 Rev. 1.8 (12/17)