
Page 53 - Norco Patient Orientation Handbook e-book
P. 53
Discuss emergency backup in the event of a GP or concentrator failure, including adequate backup (6 hours
of "E" or "K" cylinders) available.
Discuss applicable alarms on the 10 LPM concentrator, as applicable.
Discuss proper procedures to be taken by the patient or caregiver in the event of equipment failure.
Discuss liquid oxygen safety guidelines, as applicable.
Discuss functional check schedule and proper documentation.
Demonstration for Oxygen Conserving Devices (Liquid & High Pressure)
See “Demonstration for Cylinder High Pressure System” for general instructions.
Discuss theory of operation: 1) Unit will only provide oxygen upon inspiration, 2) Cylinder should last two
to three times longer than a standard system, 3) Respiratory rate plays a major role in tank times. 4) Flow
can be set to conserving or continuous on some models.
Demonstrate regulator placement or LOX filling procedure (see High Pressure Oxygen System or Liquid
Oxygen Demonstration Procedure).
Set liter flow to prescribed level and discuss alarms (if applicable).
Demonstrate proper placement of single or dual lumen nasal cannula.
Discuss tank times (see Oxygen Flow/Time Chart).
Demonstration for Concentrator
Turn oxygen concentrator on and discuss theory of operation: 1) Separates oxygen from air, 2) Purges
nitrogen from the oxygen, 3) Stores oxygen in a holding tank available for use at the prescribed lpm.
Ensure that concentrator is plugged directly in to a properly grounded outlet.
Demonstrate proper placement, assembly and filling of the bubble humidifier. Ensure that the humidifier
“bubbles” once the unit is turned on.
Demonstrate proper placement of nasal cannula/mask.
Demonstrate proper oxygen setting (line should split the ball).
Discuss alarms and troubleshooting: 1) Standard 3 alarm tones when concentrator is turned on. 2) Power
failure alarm (short alarm with a pause between alarms). 3) Concentrator failure alarm (continuous tone).
Do not place concentrator close to any object. Keep at least 18 inches clearance on all sides. Place
concentrator in an open well ventilated area to prevent overheating. Keep concentrator away from
flammable objects and at least five feet from open flame.
Discuss follow up with patient, including concentrator check by Norco staff.
Functional check schedule: Concentrator check annually (some contracts require quarterly checks).
Preventive Maintenance schedule: Performed annually.
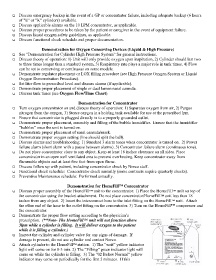
Demonstration for HomeFill™ Concentrator
Discuss proper assembly of the HomeFill™ unit to the concentrator: 1) Place the HomeFill™ unit on top of
the concentrator using the bracket attachment. Do not place concentrator/HomeFill™ unit less than 18
inches from any object. 2) Insert the interconnect hose to the inlet fitting on the HomeFill™ unit. Attach
the other end of the hose to the outlet fitting on the concentrator. 3) Turn on the HomeFill™ compressor and
the concentrator.
Demonstrate the proper flow setting according to the physician’s
prescription. (**Note- The HomeFill™ unit will not function above
3lpm while a cylinder is filling. It will deliver oxygen to the patient
while it is filling a cylinder.)
Inspect the cylinder and cylinder valve for any signs of damage. If
damage is present, do not use cylinder and contact Norco.
Attach cylinder to the HomeFill™ station. 1) The “wait” yellow indicator
light will come on for 0-3 min. 2) The “Filling” green indicator light will
come on while the cylinder is filling. 3) The “02 Below Normal” yellow
indicator may come on periodically for the first 5 minutes. If this