
Page 56 - Norco Patient Orientation Handbook e-book
P. 56
Patient Instructions for “E” Cylinder
Note: each new cylinder comes with a plastic washer (under the plastic cover). If the regulator already has a
plastic washer in the coupling mechanism, you do not need a new washer. Use only one washer. Using more
than one washer may make the regulator leak.
1. Place cylinder in stand. Tighten thumbscrew on front of cart to secure
tank to stand. Note: The “E: cylinder neck has a white plastic cover.
Pull on the tab to remove the plastic cover.
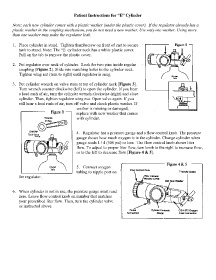
2. Put regulator over neck of cylinder. Look for two pins inside regular
coupling [Figure 2]. Slide into matching holes in the cylinder neck.
Tighten wing nut (turn to right) until regulator is snug.
3. Put cylinder wrench on valve stem at top of cylinder neck [Figure 3].
Turn wrench counter clockwise (left) to open the cylinder. If you hear
a loud rush of air, turn the cylinder wrench clockwise (right) and close
cylinder. Then, tighten regulator wing nut. Open valve again. If you
still hear a loud rush of air, turn off valve and check plastic washer. If
washer is missing or damaged,
replace with new washer that comes
with cylinder.
4. Regulator has a pressure gauge and a flow control knob. The pressure
gauge shows how much oxygen is in the cylinder. Change cylinder when
gauge reads 1 / 4 (500 psi) or less. The flow control knob shows liter
flow. To adjust to proper liter flow, turn knob to the right to increase flow,
or to the left to decrease flow [Figure 4 & 5].
5. Connect oxygen
tubing to nipple port on
the regulator.
6. When cylinder is not in use, the pressure gauge must read
zero. Leave flow control knob on number that matches
your prescribed liter flow. Then, turn the cylinder valve
as instructed above.