
Page 153 - Med Plaza and Cancer Center
P. 153
"Oil-Less” Medical Air Medical Systems
6.0 Inspection/Replacement Procedures
6.6 Replacing the Piston Pin
WARNING:
To protect the lives of patients, always notify the appropriate medical facility staff before performing any
maintenance or service procedures on the air system. Compressed air levels may be affected during
maintenance or service procedures.
WARNING:
Turn off all electrical power to the compressor that is being serviced to prevent electrical shock hazard.
1. Turn the H-O-A Switch OFF on the compressor being serviced.
2. Close the isolation (shutoff) valve of the compressor being serviced. Relieve pressure from the
compressor. Closing the isolation (shutoff) valve of the compressor being serviced allows other
compressors to continue to operate without allowing a backflow of pressure into the serviced compressor.
3. Disconnect intake, discharge and unloader air lines on the compressor being serviced. Isolate intake with a
cap or plug to prevent room air from entering other operating compressors.
4. Remove the four (4) nuts that secure the cylinder to the crankcase and lift the cylinder off, exposing the
piston.
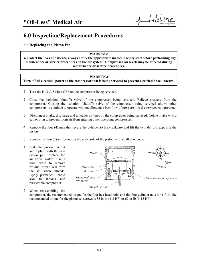
5. Remove the two (2) set screws on the underside of the piston with an allen wrench.
1. Slide the piston pin out
and replace with the new
piston pin. Replace the
air valve gasket. Use a
wire brush to remove
residual thread seal from
the set screw threads.
Apply permanent thread
seal to threads and
reassemble compressor.
2. When reassembling the
compressor, the recommended torque for the four hex head bolts and the four cylinder nuts is 41 ft-lb; the
recommended torque for the piston set screws is 35 in-lb (1-3 HP) or 62 in-lb (5-15 HP).
6-11