
Page 997 - Med Plaza and Cancer Center
P. 997
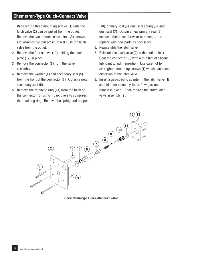
Chemetron-Type Quick-Connect Valve


        1. Back off the three mounting screws (1) until the   (10), primary seal (9), dust seal spring (8), and
           latch valve (2) can be pulled from the outlet.     dust seal (7).  Obtain a new primary seal (9).
           Remove the two bottom screws first.  As screws     Inspect other items for wear or damage, and
           are loosened system pressure will push the latch   replace with new parts as necessary.
           valve from the outlet.                          6. Reassemble the latch valve.
        2. Remove the four screws (13) holding the back    7. Reinstall the latch valve (2) in the outlet block.
           plate (12) in place.                               Coat the connector (6) with a thin film of silicone
        3. Remove the connector (6) from the valve            lubricant to aid in insertion.  Use care not to
           assembly.                                          overtighten mounting screws (1) which can cause
        4. Remove the washer (4) and secondary seal (5)       distortion of the latch valve.
           from the front of the connector (6).  Obtain a new  8. Insert a gas-specific adapter in the latch valve.  It
           secondary seal (5).                                should enter smoothly, latch, flow gas, and
        5. Remove the retaining ring (11) from the back of    remain in place.  If not, replace the entire latch-
           the connector (6) using Truarc pliers to compress  valve assembly (2).
           the retaining ring.  Remove the spring and poppet


                                                                                 12 13


                                                                             11
                                                                         10
                                                                    9
                                                                 8
                                                           7
                                2            3   5    6


                         1


                                                4


                                        Chemetron-Type Quick-Connect Valve


         6   Part No. 847036-00 Rev. D