
Page 999 - Med Plaza and Cancer Center
P. 999
DISS Valve
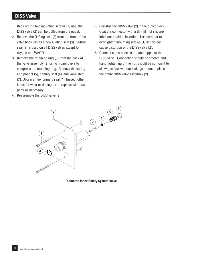
1. Back off the two mounting screws (1) until the 5. Reinstall the DISS valve (2) in the outlet block.
DISS valve (2) can be pulled from the outlet. Coat the connector with a thin film of silicone
2. Remove the O-Ring seal (3) from the front of the lubricant to aid in insertion. Use care not to
valve body. Install a new O-Ring seal (3). O-Ring overtighten mounting screws (1) as this can
seal (3) is used on all DISS valves except for cause distortion of the DISS valve (2).
oxygen and WAGD. 6. Connect a gas-specific nut and nipple to the
3. Remove the retaining ring (6) from the back of DISS valve. Connection should be smooth and
the valve assembly (2) using Truarc pliers to hand tightening of the nut should be sufficient to
compress the retaining ring. Remove the spring allow gas flow without leakage. If not, replace
and poppet (5), primary seal (4), and valve stem the entire DISS valve assembly (2).
(7). Obtain a new primary seal (4). Inspect other
items for wear or damage, and replace with new
parts as necessary.
4. Reassemble the DISS valve (2).
6
2 5
4
7
1
3
Diameter-Index Safety System Valve
8 Part No. 847036-00 Rev. D