
Page 891 - Chief Architect Reference Manual
P. 891
Special Roof Trusses
2. Check the box beside Attic Truss and Draw a new truss from an existing truss to
click OK. See “Roof Truss Specification the roof edge, as you would to draw a hip or
Dialog” on page 892. end jack truss; or draw a truss between two
trusses, forming a girder. This may be
The final product can be scrutinized in a necessary for a large opening, such as a
framing overview or in the Truss Detail skylight.
window. See “Truss Details” on page 881.
Trusses cannot be drawn through each other.
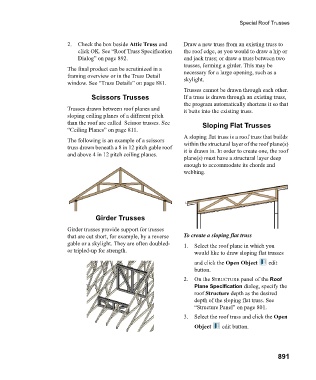
Scissors Trusses If a truss is drawn through an existing truss,
the program automatically shortens it so that
Trusses drawn between roof planes and it butts into the existing truss.
sloping ceiling planes of a different pitch
than the roof are called Scissor trusses. See Sloping Flat Trusses
“Ceiling Planes” on page 811.
A sloping flat truss is a roof truss that builds
The following is an example of a scissors within the structural layer of the roof plane(s)
truss drawn beneath a 8 in 12 pitch gable roof it is drawn in. In order to create one, the roof
and above 4 in 12 pitch ceiling planes.
plane(s) must have a structural layer deep
enough to accommodate its chords and
webbing.
Girder Trusses
Girder trusses provide support for trusses
that are cut short, for example, by a reverse To create a sloping flat truss
gable or a skylight. They are often doubled- 1. Select the roof plane in which you
or tripled-up for strength. would like to draw sloping flat trusses
and click the Open Object e d i t
button.
2. On the STRUCTURE panel of the Roof
Plane Specification dialog, specify the
roof Structure depth as the desired
depth of the sloping flat truss. See
“Structure Panel” on page 801.
3. Select the roof truss and click the Open
Object edit button.
891