
Page 63 - DPM3_FallandWinter_2022
P. 63
PREPARATION
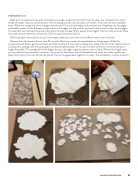
Read the manufacturer’s tips and tricks before you begin using the Form Flex! Dust the clean, dry mold with corn starch. Shake off excess. Take out a small amount of the molding compound and knead until smooth. Form and roll into a snakelike shape. Place the compound into the largest central area of the individual object and push with your fingertips into the edges and smaller spaces. Push off excess compound from the edges into the mold so you won’t have to trim or clean up the edges. You also don’t want to leave the product domed on the top. Scrape off any excess that is higher than the mold to reuse. Place the mold into the freezer for a minimum of 20 minutes, compound side up.
While waiting for the molds to set up in the freezer, base your cone with Country Red or other color of choice.
Remove from the freezer after at least 20 minutes. Work over a piece of waxed palette or freezer paper. While the compound is still frozen, gently push each area from the back of the mold to release the casting from the mold. Gently remove and place the castings onto the waxed paper surface and allow at least 10 minutes for them to come to room temperature - longer if possible. The castings will still be fragile, but you can begin to gently adhere to the surface. While in this fragile state, you can reform the compound if necessary. You may find that stems and small details will not come out of the mold as one piece. Don’t worry! You can still use the pieces! They can be glued back together or used in the composition in other locations.
DECORATIVEPAINTERS.ORG 61
