
Page 36 - DPM4_Winter_2021_Flipbook
P. 36
EARS
EARS
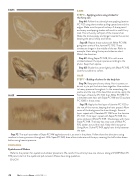
STEP 6 - Applying colors using strokes for the furry ears
Step 6A: Follow the colored photo applying Jasmine PC 1012 using short strokes pulling upward around the edges. Make sure the pencil is sharp. A sharp pencil and many overlapping strokes will result in a soft furry look. This is the only soft part of the moose’s hair. Make the strokes wispy and longer towards the center, keeping the pencil sharp at all times.
Step 6B: Repeat these stokes with White PC 938, going over some of the Jasmine PC 1012. These strokes are longer in the middle of the ear. Refer to example. Hairs along the top and sides are short. Watch the direction.
Step 6C: Using Sepia PC 948, fill in with more strokes between the open spaces according to the photo. Keep them sparse.
Step 6D: Shade the center lightly with Black PC 935. Use the scrubber to soften.
HAIR
STEP 7 - Buildup of colors for the body hair
Step 7A: Keep pencils very sharp. Hair is coarse, so do not try to put the hairs close together. Use medium to heavy pressure throughout. In the areas along the jawline and the top of the head that are white, apply the first layer of Jasmine PC 1012, then White PC 938. Fill in between some hairs with Sepia PC 948 and Chocolate PC 1082 in those areas.
Step 7B: Apply the first layer of Jasmine PC 1012 to the rest of the moose, keeping the hairs spaced. Allow some of the background to show through. Second layer: repeat with Chocolate PC 1082 over the Jasmine PC 1012. Third layer: repeat with Sepia PC 948. Do some strokes in White PC 938. Shade areas with more Sepia PC 948. The body has a top coat of Black PC 935, darker around the neck. Keep the lines sparse. Using Burnt Ochre PC 943, apply hairs thinly between the eyes.
HAIR
Step 7C: The eye has strokes of Sepia PC 948 applied around it, as seen in the photo. Follow those line directions using medium to heavy pressure throughout. With Sepia PC 948, draw a few circles around the eye, covering the half circles drawn before using heavier pressure.
FINISHING
Eyelashes and Wiskers
Refer to the pattern for eyelash and whisker placement. Be careful. You will only have one chance. Using a SHARP Black PC 935 pencil, start at the eyelid and pull outward. Moose have long eyelashes.
ENJOY!
34 TheDecorativePainter • WINTER 2021
