
Page 39 - Computeractive - January 2, 2018 UK
P. 39
1 2
5
3
4
1
2
5 3
4
STEP To rename multiple fi les in one g o, press C trl, click t o STEP Next, open DMEX and m ove y our c ursor to ‘Change t o’.
4 select the fi les you w ant t o r ename, open DMEX, m ove 5 Y o u’ll see o ptions to open the f older a bove the o ne
you’re in 1 or the d rive it’s in 2 . C licking D rive 3 lists
your cursor to File Operations, t hen
c lick ‘Rename
files’. In the w indow t hat o pens, y ou’ll s ee the fi les’ e xisting all t he drives on your PC. C lick one t o o pen i t. One o f t he
names 1 and w here they are s tored 2 . Th ere a re different w ays program’s m ost u seful t ools is the o ption to add a l ist o f f olders
you c an rename your files. Th e e asiest w ay is to select the you a ccess often to the ‘ Change to’ m enu. To do this, o pen t he
relevant dropdown menu at the b ottom r ight, then double-click first folder y ou want, c lick ‘A dd current p ath’ 4 , t hen c lick
the r elevant renaming value(s) you w ant 3 . Y ou can also modify Accept. R epeat t his t o a dd other f olders 5 . Y ou can rearrange
the d ate a nd time when your files were created 4 . C lick Change their o rder by clicking ‘Configure paths’ at the b ottom.
Names 5 to confirm and r ename y our fi les.
3
1
2
2
1
4
3
4
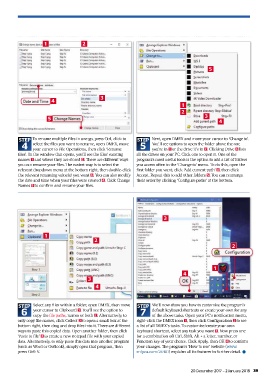
STEP Select any fi les within a f older, open DMEX, t hen m ove STEP We’ll n ow show you h ow to customise the p rogram’s
6 your cursor to Clipboard 1 . Y ou’ll s ee the o ption to 7 default k eyboard s hortcuts or create your own f or any
of the a bove tasks. Open your PC’s notification menu,
copy t he file p aths, n ames or both 2 . A lternatively, t o
only c opy fi le names, click C ollect 3 to open a s mall box a t t he right-click t he DMEX icon 1 , t hen c lick Configuration 2 to see
bottom right, then drag and d rop fi les into it. Th ere a re different a l ist o f a ll DMEX’s tasks. To customise/create y our o wn
ways t o p aste this copied d ata. O pen a nother f older, then click keyboard shortcut, s elect any t ask y ou want 3 . N ow press o ne
‘Paste to file’ 4 to create a n ew notepad file w ith y our c opied (or a c ombination of) C trl, Shift, Alt + a l etter, number, o r
data. A lternatively, t o o nly p aste this data into another p rogram Function key o f y our c hoice. Click A pply , then OK 4 to confirm
(such a s W ord o r O utlook), simply open that program, then your changes. The program’s ‘ How t o u se’ w ebsite (www.
press C trl+V. snipca.com/26401) e xplains all i ts features in further detail. ●
20 December 2017 – 2 J anuary 2018 39