Page 482 - Tar River Updated
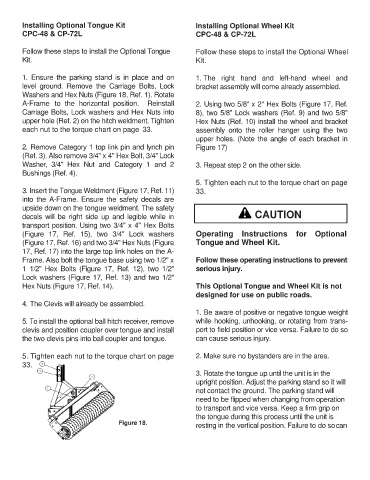
P. 482
Installing Optional Tongue Kit                            Installing Optional Wheel Kit
        CPC-48 & CP-72L                                           CPC-48 & CP-72L

        Follow these steps to install the Optional Tongue         Follow these steps to install the Optional Wheel
        Kit.                                                      Kit.

        1.  Ensure  the  parking  stand  is  in  place  and  on   1. The  right  hand  and  left-hand  wheel  and
        level  ground.  Remove  the  Carriage  Bolts,  Lock       bracket assembly will come already assembled.
        Washers and Hex Nuts (Figure 18, Ref. 1). Rotate
        A-Frame  to  the  horizontal  position.    Reinstall      2. Using two 5/8" x 2" Hex Bolts (Figure 17, Ref.
        Carriage Bolts, Lock washers and Hex Nuts into            8), two 5/8" Lock washers (Ref. 9) and two 5/8"
        upper hole (Ref. 2) on the hitch weldment. Tighten        Hex Nuts (Ref. 10) install the wheel and bracket
        each nut to the torque chart on page  33.                 assembly  onto  the  roller  hanger  using  the  two
                                                                  upper holes. (Note the angle of each bracket in
        2.  Remove Category 1 top link pin and lynch pin          Figure 17)
        (Ref. 3). Also remove 3/4" x 4" Hex Bolt, 3/4" Lock
        Washer,  3/4"  Hex  Nut  and  Category  1  and  2         3. Repeat step 2 on the other side.
        Bushings (Ref. 4).
                                                                  5. Tighten each nut to the torque chart on page
        3.  Insert the Tongue Weldment (Figure 17, Ref. 11)       33.
        into  the  A-Frame.  Ensure  the  safety  decals  are
        upside down on the tongue weldment. The safety
        decals  will  be  right  side  up  and  legible  while  in                   CAUTION
        transport position. Using two 3/4" x 4" Hex Bolts
        (Figure  17,  Ref.  15),  two  3/4"  Lock  washers        Operating  Instructions  for  Optional
        (Figure 17, Ref. 16) and two 3/4" Hex Nuts (Figure        Tongue and Wheel Kit.
        17, Ref. 17) into the large top link holes on the A-
        Frame. Also bolt the tongue base using two 1/2" x         Follow these operating instructions to prevent
        1  1/2"  Hex  Bolts  (Figure  17,  Ref.  12),  two  1/2"   serious injury.
        Lock washers (Figure 17, Ref. 13) and two 1/2"
        Hex Nuts (Figure 17, Ref. 14).                            This Optional Tongue and Wheel Kit is not
                                                                  designed for use on public roads.
        4.  The Clevis will already be assembled.
                                                                  1. Be aware of positive or negative tongue weight
        5.  To install the optional ball hitch receiver, remove   while hooking, unhooking, or rotating from trans-
        clevis and position coupler over tongue and install       port to field position or vice versa. Failure to do so
        the two clevis pins into ball coupler and tongue.         can cause serious injury.

        5. Tighten each nut to the torque chart on page           2. Make sure no bystanders are in the area.
        33.    3
              4                2                                  3. Rotate the tongue up until the unit is in the
                                                                  upright position. Adjust the parking stand so it will
                 1                                                not contact the ground. The parking stand will
                                                                  need to be flipped when changing from operation
                                                                  to transport and vice versa. Keep a firm grip on
                                                                  the tongue during this process until the unit is
                                        Figure 18.                resting in the vertical position. Failure to do so can

