
Page 175 - FAT 105 4.17 MOODLE
P. 175
You should design your bench or benches to fit needs. A pegboard area is also handy for tool
into the available space and to serve your own hanging. The overall size of the unit, spacing of
needs. If you are handy with woodworking shelves, etc. can be varied to suit your needs.
tools, you might want to build a few drawers for
certain tools. If not, you can buy the prefabri- APARTMENT WORKBENCH
cated drawers of steel or plastic and install them
Apartment dwellers in cities are usually handi-
by screwing the brackets to the underside of the
capped by not having sufficient space in which
bench top.
to do gun repairs. However, it is possible to have
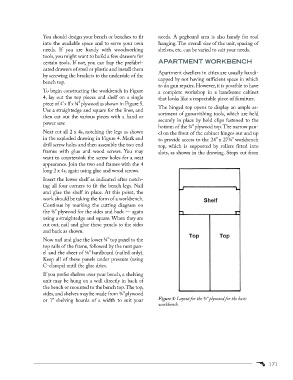
To begin constructing the workbench in Figure a complete workshop in a handsome cabinet
4, lay out the top pieces and shelf on a single that looks like a respectable piece of furniture.
piece of 4’ x 8’x 3/4” plywood as shown in Figure 5.
The hinged top opens to display an ample as-
Use a straightedge and square for the lines, and
sortment of gunsmithing tools, which are held
then cut out the various pieces with a hand or
securely in place by hold clips fastened to the
power saw.
bottom of the 3/4” plywood top. The narrow pan-
Next cut all 2 x 4s, notching the legs as shown el on the front of the cabinet hinges out and up
in the exploded drawing in Figure 4. Mark and to provide access to the 24” x 273/4” workbench
drill screw holes and then assemble the two end top, which is supported by rollers fitted into
frames with glue and wood screws. You may slots, as shown in the drawing. Stops cut from
want to countersink the screw holes for a neat
appearance. Join the two end frames with the 4
long 2 x 4s, again using glue and wood screws.
Insert the lower shelf as indicated after notch-
ing all four corners to fit the bench legs. Nail
and glue the shelf in place. At this point, the
work should be taking the form of a workbench.
Continue by marking the cutting diagram on
the 3/8” plywood for the sides and back — again
using a straightedge and square. When they are
cut out, nail and glue these panels to the sides
and back as shown.
Now nail and glue the lower 3/4” top panel to the
top rails of the frame, followed by the next pan-
el and the sheet of ⅛” hardboard (nailed only).
Keep all of these panels under pressure (using
C-clamps) until the glue dries.
If you prefer shelves over your bench, a shelving
unit may be hung on a wall directly in back of
the bench or mounted to the bench top. The top,
sides, and shelves may be made from 3/4” plywood
Figure 5: Layout for the 3/4” plywood for the basic
or 1” shelving boards of a width to suit your
workbench.
171