
Page 169 - Divyank Tyagi
P. 169
|
inCreasing effiCienT VieW managemenT 135
7. Click OK to close the dialog box and return to the Browser Organization dialog box.
8. Check the box next to Zone/Phase to make this browser setting current and click OK to
close the dialog box.
The Project Browser is now ready to support the use of the custom view parameters you
created earlier.
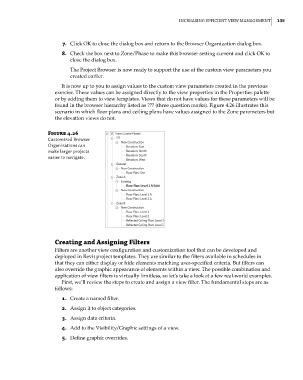
It is now up to you to assign values to the custom view parameters created in the previous
exercise. These values can be assigned directly to the view properties in the Properties palette
or by adding them to view templates. Views that do not have values for these parameters will be
found in the browser hierarchy listed as ??? (three question marks). Figure 4.26 illustrates this
scenario in which floor plans and ceiling plans have values assigned to the Zone parameters but
the elevation views do not.
Figure 4.26
Customized Browser
organizations can
make larger projects
easier to navigate.
Creating and assigning Filters
Filters are another view configuration and customization tool that can be developed and
deployed in Revit project templates. They are similar to the filters available in schedules in
that they can either display or hide elements matching user-specified criteria. But filters can
also override the graphic appearance of elements within a view. The possible combination and
application of view filters is virtually limitless, so let’s take a look at a few real-world examples.
First, we’ll review the steps to create and assign a view filter. The fundamental steps are as
follows:
1. Create a named filter.
2. Assign it to object categories.
3. Assign data criteria.
4. Add to the Visibility/Graphic settings of a view.
5. Define graphic overrides.
c04.indd 135 5/3/2014 10:37:01 AM