
Page 261 - Divyank Tyagi
P. 261
|
using the Coordination tools 227
running an Interference Check - an exercise
Certification Let’s take a look at the Revit interference-checking process. For this exercise, you will need to
Objective download three sample files to your computer or network: c06-Interference-Arch.rvt,
c06-Interference-Mech.rvt, and c06-Interference-Stru.rvt. You can download these files
from this book’s web page. The sample files are already linked into each other using relative
paths, so be sure to place all three files in the same folder. Then follow these steps:
1. Open the file c06-Interference-Mech.rvt and activate the default 3D view.
2. Switch to the Collaborate tab, find the Coordinate panel, and choose Interference Check ➢
Run Interference Check.
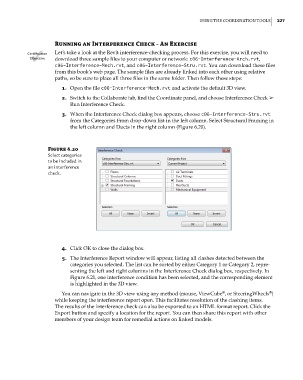
3. When the Interference Check dialog box appears, choose c06-Interference-Stru.rvt
from the Categories From drop-down list in the left column. Select Structural Framing in
the left column and Ducts in the right column (Figure 6.20).
Figure 6.20
select categories
to be included in
an interference
check.
4. Click OK to close the dialog box.
5. The Interference Report window will appear, listing all clashes detected between the
categories you selected. The list can be sorted by either Category 1 or Category 2, repre-
senting the left and right columns in the Interference Check dialog box, respectively. In
Figure 6.21, one interference condition has been selected, and the corresponding element
is highlighted in the 3D view.
®
You can navigate in the 3D view using any method (mouse, ViewCube , or SteeringWheels )
®
while keeping the interference report open. This facilitates resolution of the clashing items.
The results of the interference check can also be exported to an HTML format report. Click the
Export button and specify a location for the report. You can then share this report with other
members of your design team for remedial actions on linked models.
c06.indd 227 5/3/2014 12:48:08 PM