
Page 363 - Divyank Tyagi
P. 363
|
Creating a ConCeptual Mass 329
Driving points These are reference points that control the geometry of a dependent
spline. When you select these points, they will allow you to manipulate them with 3D con-
trols. in revit, these points will appear larger on the screen to distinguish them from the
other points.
hosted points These are reference points that exist on a spline, line, surface, or some
other element. Visually, they appear as smaller than driving points. Hosted points can be
used to drive the manipulation of geometry.
Free points These are reference points that are simply placed on a reference plane. Free
points will show 3D controls when selected and are moveable on their reference plane.
For your next step, you need to add a parameter to control the location of the points along
the reference line. The property of the point called Normalized Curve Parameter is a ratio
of the length of the host line expressed from 0.0 to 1.0. If you want to keep a point at the
midpoint of a reference line, this property must always be 0.5. If you select a point and
you don’t see this property, you might need to delete the point and try placing it again;
this ensures that you select the Draw On Face option in the Draw panel of the ribbon.
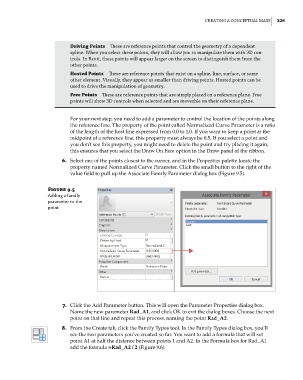
6. Select one of the points closest to the corner, and in the Properties palette locate the
property named Normalized Curve Parameter. Click the small button to the right of the
value field to pull up the Associate Family Parameter dialog box (Figure 9.5).
Figure 9.5
adding a family
parameter to the
point
7. Click the Add Parameter button. This will open the Parameter Properties dialog box.
Name the new parameter Rad_A1, and click OK to exit the dialog boxes. Choose the next
point on that line and repeat this process, naming the point Rad_A2.
8. From the Create tab, click the Family Types tool. In the Family Types dialog box, you’ll
see the two parameters you’ve created so far. You want to add a formula that will set
point A1 at half the distance between points 1 and A2. In the Formula box for Rad_A1
add the formula =Rad_A2 / 2 (Figure 9.6).
c09.indd 329 5/3/2014 11:01:04 AM