
Page 603 - Divyank Tyagi
P. 603
|
Using adVanCed shape editing With Floors and rooFs 569
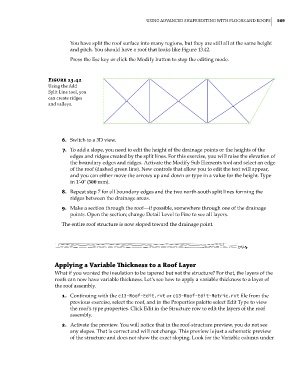
You have split the roof surface into many regions, but they are still all at the same height
and pitch. You should have a roof that looks like Figure 13.42.
Press the Esc key or click the Modify button to stop the editing mode.
Figure 13.42
Using the add
split line tool, you
can create ridges
and valleys.
6. Switch to a 3D view.
7. To add a slope, you need to edit the height of the drainage points or the heights of the
edges and ridges created by the split lines. For this exercise, you will raise the elevation of
the boundary edges and ridges. Activate the Modify Sub Elements tool and select an edge
of the roof (dashed green line). New controls that allow you to edit the text will appear,
and you can either move the arrows up and down or type in a value for the height. Type
in 1ʹ-0ʺ (300 mm).
8. Repeat step 7 for all boundary edges and the two north-south split lines forming the
ridges between the drainage areas.
9. Make a section through the roof—if possible, somewhere through one of the drainage
points. Open the section; change Detail Level to Fine to see all layers.
The entire roof structure is now sloped toward the drainage point.
applying a Variable Thickness to a Roof Layer
What if you wanted the insulation to be tapered but not the structure? For that, the layers of the
roofs can now have variable thickness. Let’s see how to apply a variable thickness to a layer of
the roof assembly.
1. Continuing with the c13-Roof-Edit.rvt or c13-Roof-Edit-Metric.rvt file from the
previous exercise, select the roof, and in the Properties palette select Edit Type to view
the roof’s type properties. Click Edit in the Structure row to edit the layers of the roof
assembly.
2. Activate the preview. You will notice that in the roof-structure preview, you do not see
any slopes. That is correct and will not change. This preview is just a schematic preview
of the structure and does not show the exact sloping. Look for the Variable column under
c13.indd 569 05-05-2014 16:57:20