
Page 602 - Divyank Tyagi
P. 602
568 | ChapTeR 13 Modeling Floors, Ceilings, and rooFs
Add Point This tool allows you to add points on the top face of a roof or floor. Points can
be added on edges or surfaces and can be modified after placement using the Modify Sub
Elements tool.
Add Split Line This tool allows you to sketch directly on the top face of the element, which
adds vertices so that hips and valleys can be created when the elevations of the lines are
modified using the Modify Sub Elements tool.
Pick Supports This tool allows you to pick linear beams and walls in order to create new
split edges and set the slope and/or elevation of the floor or roof automatically.
Once a floor or roof has been modified using any of these tools, the Reset Shape button will
become active. You can use this tool to remove all modifications you applied to the selected floor
or roof.
Creating a Roof with a Sloped Topping
Let’s work through an exercise that shows you how to make a roof with a sloped topping like
the one shown in Figure 13.41 (shown in plan view).
Follow these steps:
1. Open c13-Roof-Edit.rvt or c13-Roof-Edit-Metric.rvt from the book’s companion
website.
2. Select the roof that has already been prepared for you.
3. Activate the Add Split Line tool (the color of the rest of the model grays out while the roof
lines are dashed green).
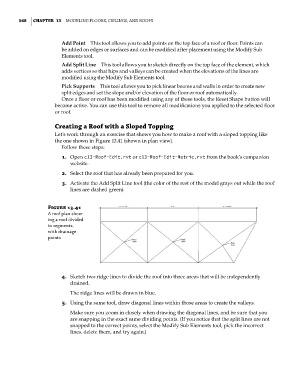
Figure 13.41
a roof plan show-
ing a roof divided
in segments,
with drainage
points
4. Sketch two ridge lines to divide the roof into three areas that will be independently
drained.
The ridge lines will be drawn in blue.
5. Using the same tool, draw diagonal lines within those areas to create the valleys.
Make sure you zoom in closely when drawing the diagonal lines, and be sure that you
are snapping in the exact same dividing points. (If you notice that the split lines are not
snapped to the correct points, select the Modify Sub Elements tool, pick the incorrect
lines, delete them, and try again.)
c13.indd 568 05-05-2014 16:57:20