
Page 784 - Divyank Tyagi
P. 784
750 | ChApTer 18 AnnotAting Your Design
®
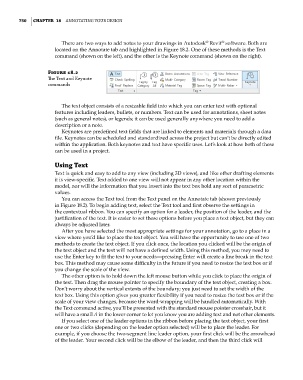
There are two ways to add notes to your drawings in Autodesk Revit software. Both are
®
located on the Annotate tab and highlighted in Figure 18.2. One of these methods is the Text
command (shown on the left), and the other is the Keynote command (shown on the right).
Figure 18.2
The text and Keynote
commands
The text object consists of a resizable field into which you can enter text with optional
features including leaders, bullets, or numbers. Text can be used for annotations, sheet notes
(such as general notes), or legends; it can be used generally anywhere you need to add a
description or a note.
Keynotes are predefined text fields that are linked to elements and materials through a data
file. Keynotes can be scheduled and standardized across the project but can’t be directly edited
within the application. Both keynotes and text have specific uses. Let’s look at how both of these
can be used in a project.
Using Text
Text is quick and easy to add to any view (including 3D views), and like other drafting elements
it is view-specific. Text added to one view will not appear in any other location within the
model, nor will the information that you insert into the text box hold any sort of parametric
values.
You can access the Text tool from the Text panel on the Annotate tab (shown previously
in Figure 18.2). To begin adding text, select the Text tool and first observe the settings in
the contextual ribbon. You can specify an option for a leader, the position of the leader, and the
justification of the text. It is easier to set these options before you place a text object, but they can
always be adjusted later.
After you have selected the most appropriate settings for your annotation, go to a place in a
view where you’d like to place the text object. You will have the opportunity to use one of two
methods to create the text object. If you click once, the location you clicked will be the origin of
the text object and the text will not have a defined width. Using this method, you may need to
use the Enter key to fit the text to your needs—pressing Enter will create a line break in the text
box. This method may cause some difficulty in the future if you need to resize the text box or if
you change the scale of the view.
The other option is to hold down the left mouse button while you click to place the origin of
the text. Then drag the mouse pointer to specify the boundary of the text object, creating a box.
Don’t worry about the vertical extents of the boundary; you just need to set the width of the
text box. Using this option gives you greater flexibility if you need to resize the text box or if the
scale of your view changes, because the word-wrapping will be handled automatically. With
the Text command active, you’ll be presented with the standard mouse pointer crosshair, but it
will have a small A in the lower corner to let you know you are adding text and not other elements.
If you select one of the leader options in the ribbon before placing the text object, your first
one or two clicks (depending on the leader option selected) will be to place the leader. For
example, if you choose the two-segment line leader option, your first click will be the arrowhead
of the leader. Your second click will be the elbow of the leader, and then the third click will
c18.indd 750 5/3/2014 11:55:51 AM