
Page 877 - Divyank Tyagi
P. 877
|
Creating “exPLoDeD” axonoMetriC VieWs 843
Notice how the door was moved without selecting it but the storefront system was not.
As you create these types of views, you’ll need to make sure you’re selecting all of the
elements you want. If you don’t get it exactly right, however, don’t worry. With these dis-
placed walls highlighted, some new tools are active in the Modify | Displaced Elements
tab: Edit, Reset, and Path. The Reset tool will undo the displacement you have created
and reset the walls to their original locations.
8. To complete this step, you need to use the Edit button. Select Edit and notice how the
view has changed.
The elements within the displacement group are highlighted orange, and a new
Edit Displacement Set panel has popped up (Figure 20.27) similar to the Edit Groups
panel.
Figure 20.27
The edit
Displacement
set panel
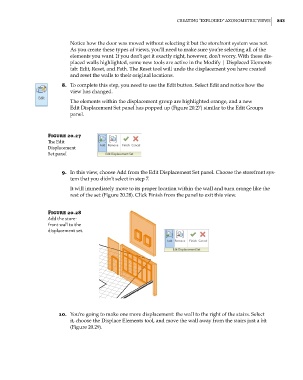
9. In this view, choose Add from the Edit Displacement Set panel. Choose the storefront sys-
tem that you didn’t select in step 7.
It will immediately move to its proper location within the wall and turn orange like the
rest of the set (Figure 20.28). Click Finish from the panel to exit this view.
Figure 20.28
add the store-
front wall to the
displacement set.
10. You’re going to make one more displacement: the wall to the right of the stairs. Select
it, choose the Displace Elements tool, and move the wall away from the stairs just a bit
(Figure 20.29).
c20.indd 843 5/3/2014 12:00:03 PM