
Page 878 - Divyank Tyagi
P. 878
844 | ChaPter 20 Presenting Your Design
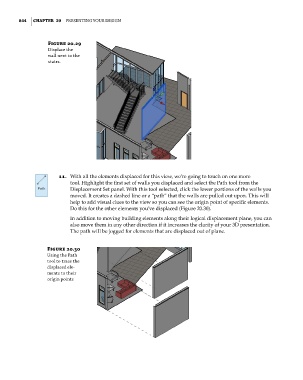
Figure 20.29
Displace the
wall next to the
stairs.
11. With all the elements displaced for this view, we’re going to touch on one more
tool. Highlight the first set of walls you displaced and select the Path tool from the
Displacement Set panel. With this tool selected, click the lower portions of the walls you
moved. It creates a dashed line or a “path” that the walls are pulled out upon. This will
help to add visual clues to the view so you can see the origin point of specific elements.
Do this for the other elements you’ve displaced (Figure 20.30).
In addition to moving building elements along their logical displacement plane, you can
also move them in any other direction if it increases the clarity of your 3D presentation.
The path will be jogged for elements that are displaced out of plane.
Figure 20.30
using the Path
tool to trace the
displaced ele-
ments to their
origin points
c20.indd 844 5/3/2014 12:00:03 PM