
Page 139 - Parker - Vacuum products
P. 139
Catalog 0802-E (Revised 02-01-12) Pressure Sensors
Programming Features MPS-33 1-Color Panel Mount
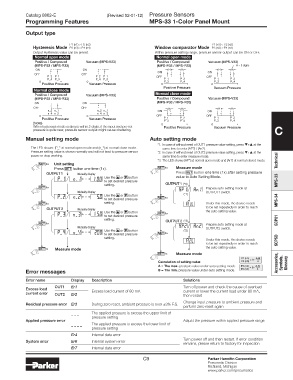
Output type
P1 (n1) > P2 (n2) P1 (n1) < P2 (n2)
Hysteresis Mode P3 (n3) > P4 (n4) Window comparator Mode P3 (n3) < P4 (n4)
Output Hysteresis value can be preset. Within pressure setting range, pressure sensor output can be ON or OFF.
Normal open mode Normal open mode
Positive / Compound Vacuum (MPS-V33) Positive / Compound Vacuum (MPS-V33)
(MPS-P33 / MPS-R33) (MPS-P33 / MPS-R33) H = 3 digits
ON ON H H H H
ON ON
OFF OFF
P_2 P_1 P_2 P_1 OFF OFF
P_4 P_3 P_4 P_3 P_1 P_2 P_1 P_2
0 0 P_3 P_4 P_3 P_4
Positive Pressure Vacuum Pressure 0 0
Positive Pressure Vacuum Pressure
Normal close mode
Positive / Compound Vacuum (MPS-V33) Normal close mode
(MPS-P33 / MPS-R33) Positive / Compound Vacuum (MPS-V33)
ON ON (MPS-P33 / MPS-R33)
OFF OFF H H H H
n_2 n_1 n_2 n_1 ON ON
n_4 n_3 n_4 n_3
0 0 OFF OFF P_1 P_2
Positive Pressure Vacuum Pressure P_1 P_2 P_3 P_4
P_3
P_4
(Note) 0 0
When hysteresis mode setting is within 2 digits, if the input and pre-set Positive Pressure Vacuum Pressure
pressure is quite near, pressure sensor output might cause chattering. C
Manual setting mode Auto setting mode
*1. In case of without need of OUT1 pressure value setting, press + at the
The LED shows: (P_* at normal open mode and (n_*) at normal close mode. same time to enter (AP2) / (An2).
Pressure setting value is shown normally and will not lead to pressure sensor *2. In case of without need of OUT2 pressure value setting, press + at the
pause or stop working. same time to enter measure mode.
*3. The LED shows (AP*) at normal open mode and (An*) at normal closed mode. Technical
SET 1x Unit setting
SET button one time (1x).
Press SET 1x Measure mode
SET button one time (1x) after setting pressure
OUTPUT 1 Mutually display Press
Use the or button value to Auto Setting Mode.
to set desired pressure MPS-33
setting. OUTPUT 1 (*3)
SET 1x Prepare auto setting mode at
Mutually display (*1) OUTPUT1 switch.
Use the or button
to set desired pressure SET 1x MPS-34
SET 1x setting. Under this mode, the device needs
OUTPUT 2 Mutually display to be set repeatedly in order to reach
Use the or button SET 1x the auto setting value.
to set desired pressure
setting. OUTPUT 2 (*3) SCP01
SET 1x Prepare auto setting mode at
Mutually display OUTPUT2 switch.
Use the or button (*2)
to set desired pressure SET 1x
setting.
Under this mode, the device needs SCPSD
to be set repeatedly in order to reach
the auto setting value.
SET1x Measure mode
SET 1x Measure mode
P1 (n1) = A - A-B
Calculation of setting value P3 (n3) 4 Accessories, Symbols, Glossary
A = The max. pressure value under auto setting mode. P2 (n2) = B - A-B
P4 (n4)
4
Error messages B = The min. pressure value under auto setting mode.
Error name Display Description Solutions
Excess load OUT1 Er1 Turn off power and check the cause of overload
current error OUT2 Er2 Excess load current of 80 mA current or lower the current load under 80 mA,
then restart
Change input pressure to ambient pressure and
Residual pressure error Er3 During zero reset, ambient pressure is over ±3% F.S.
perform zero reset again
The applied pressure is excess the upper limit of
– – – pressure setting
Applied pressure error Adjust the pressure within applied pressure range
– – – – The applied pressure is excess the lower limit of
pressure setting
Er4 Internal data error
System error Er6 Internal system error Turn power off and then restart. If error condition
remains, please return to factory for inspection
Er7 Internal data error
C9 Parker Hannifin Corporation
Pneumatic Division
Richland, Michigan
www.parker.com/pneumatics