
Page 35 - DP Vol 20 No 5_Neat
P. 35
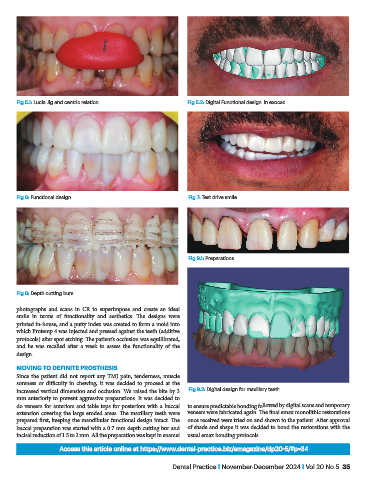
Fig 5.1: Lucia Jig and centric relation                 Fig 5.2: Digital Functional design in exocad


           Fig 6: Functional design                                Fig 7: Test drive smile


                                                                   Fig 9.1: Preparations


           Fig 8: Depth cutting burs

           photographs and scans in CR to superimpose and create an ideal
           smile in terms of functionality and aesthetics. The designs were
           printed in-house, and a putty index was created to form a mold into
           which Protemp 4 was injected and pressed against the teeth (additive
           protocols) after spot etching. The patient’s occlusion was equilibrated,
           and  he  was  recalled  after  a  week  to  assess  the  functionality  of  the
           design.

           MOVING TO DEFINITE PROSTHESIS
           Since the patient did not report any TMJ pain, tenderness, muscle
           soreness or difficulty in chewing, it was decided to proceed at the
           increased vertical dimension and occlusion. We raised the bite by 3   Fig 9.2: Digital design for maxillary teeth
           mm anteriorly to prevent aggressive preparations. It was decided to
           do veneers for anteriors and table tops for posteriors with a buccal   to ensure predictable bonding followed by digital scans and temporary
           extension covering the large eroded areas. The maxillary teeth were   veneers were fabricated again. The final emax monolithic restorations
           prepared first, keeping the mandibular functional design intact. The   once received were tried on and shown to the patient. After approval
           buccal preparation was started with a 0.7 mm depth cutting bur and   of shade and shape it was decided to bond the restorations with the
           incisal reduction of 1.5 to 2 mm. All the preparation was kept in enamel   usual emax bonding protocols.

                         Access this article online at https://www.dental-practice.biz/emagazine/dp20-5/#p=34

                                                              Dental Practice I November-December 2024 I Vol 20 No 5  35