
Page 156 - Photoshop for Lightroom Users – Scott Kelby 2nd Edition
P. 156
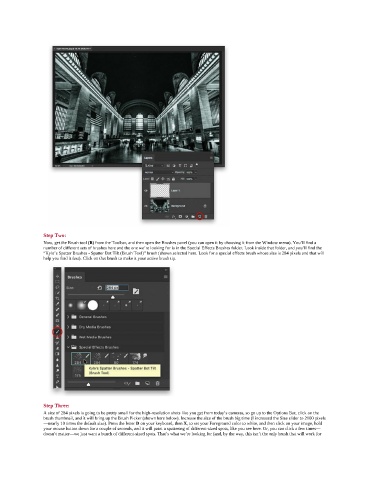
Step Two:
               Now, get the Brush tool (B) from the Toolbar, and then open the Brushes panel (you can open it by choosing it from the Window menu). You’ll find a
               number of different sets of brushes here and the one we’re looking for is in the Special Effects Brushes folder. Look inside that folder, and you’ll find the
               “Kyle’s Spatter Brushes - Spatter Bot Tilt (Brush Tool)” brush (shown selected here. Look for a special effects brush whose size is 284 pixels and that will
               help you find it fast). Click on that brush to make it your active brush tip.


               Step Three:
               A size of 284 pixels is going to be pretty small for the high-resolution shots like you get from today’s cameras, so go up to the Options Bar, click on the
               brush thumbnail, and it will bring up the Brush Picker (shown here below). Increase the size of the brush big time (I increased the Size slider to 2100 pixels
               —nearly 10 times the default size). Press the letter D on your keyboard, then X, to set your Foreground color to white, and then click on your image, hold
               your mouse button down for a couple of seconds, and it will paint a spattering of different-sized spots, like you see here. Or, you can click a few times—
               doesn’t matter—we just want a bunch of different-sized spots. That’s what we’re looking for (and, by the way, this isn’t the only brush that will work for