
Page 8 - QR CIMAR PADDLE MIXER
P. 8
8. Allow adequate time for the water, gravel, cement, and sand to thoroughly mix.
9. To discharge the cement mix, release the Drum Lock (72). Raise the Drum Latch (20) up, and pull the
Dump Handle (60) down. (See Figure D.)
10. After discharging the cement mix, raise the Dump Handle (60) to return the Drum (55) to its original position.
Lower the Drum Latch (20). Reset the Drum Lock (72). Then turn the Clutch Lever (19) to the left to stop
the Drum (55) from rotating. (See Figure D.)
11. When finished, turn off the Engine of the Mortar Mixer and allow the unit to completely cool. Then, make
sure to thoroughly clean the inside of the Drum (55) and exterior of the Mortar Mixer (see cleaning
instructions on next page.)
12. Always store the Mortar Mixer in a clean, dry, safe location out of reach of children and other unauthorized
people.
MAINTENANCE
1. WARNING! Never perform any services or maintenance on the Mortar Mixer while it is running.
Before performing any inspection, maintenance, and cleaning, turn off the Engine and disconnect the Spark
Plug Wire from the Spark Plug to prevent accidental starting. Then, allow the Engine to completely cool.
2. Before each use, inspect the general condition of the Mortar Mixer. Check for loose bolts and nuts,
misalignment, binding of moving parts, loose or broken parts, Engine problems, and any other condition
that may affect the safe operation of the Mortar Mixer. If abnormal noise or vibration occurs, turn off the
Mortar Mixer immediately and have the problem corrected before further use. Do not use damaged
equipment.
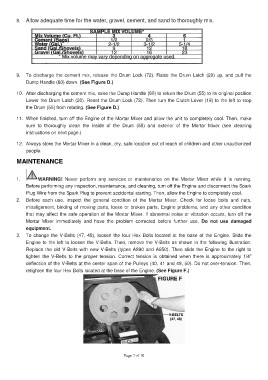
3. To change the V-Belts (47, 48), loosen the four Hex Bolts located at the base of the Engine. Slide the
Engine to the left to loosen the V-Belts. Then, remove the V-Belts as shown in the following illustration.
Replace the old V-Belts with new V-Belts (types A890 and A950). Then slide the Engine to the right to
tighten the V-Belts to the proper tension. Correct tension is obtained when there is approximately 1/4”
deflection of the V-Belts at the center span of the Pulleys (40, 41 and 49, 50). Do not over-tension. Then,
retighten the four Hex Bolts located at the base of the Engine. (See Figure F.)
Page 7 of 10