
Page 31 - The Decorative Painter - Fall 2019
P. 31
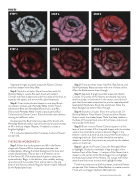
ROSES
STEP 1 STEP 2
STEP 4 STEP 5
Separate the light and dark areas with Alizarin Crimson, and then deepen with Navy Blue.
Step 3: Switch to oil color. Shine the surface with Oil Painting Medium. Load a flat wash brush with Alizarin Crimson and float shadows around the outside of the bud, to separate the petals, and around the calyx/receptacle.
Step 4: Over-stroke the bud shapes in one step. Brush- mix Alizarin Crimson with Permalba White (1:tch), French Ultramarine Blue with Permalba White (1:tch), and Raw Sienna with Permalba White (1:tch) to produce the Bud Colors and the Flower Colors. Paint all similar colors before moving to a different color.
Double-load the Bud Color (one side of the brush) with Permalba White (the other side of the brush) and pull strokes to fill in the bud shapes. Repeat, if needed, to create a brighter highlight.
Fill in calyx/receptacles after the leaves, buds and flowers are painted.
THE ROSES WORKSHEET 3
Step 1: Follow the stroke pattern and fill in the flower shape with Titanium White. Leave space between the strokes/petals, allowing the black background to show and create shaded areas. Place a dot in the bottom center
of the flower (X). Pull strokes/petal shapes to that point systematically. Begin in the bottom, then middle, working up and around the outside, from side to side, to the top, back of the flowers, before filling the flower middle, followed by the flipped petal tops.
STEP 3
      STEP 6
Step 2: There are three roses: Hot Pink, Raw Sienna, and Dark Hydrangea. Basecoat roses with one of these colors. Allow the black area to show through.
Step 3: Separate the light and dark areas with Alizarin Crimson. Four areas of the flowers are shaded: top, back and/or outside; in the bowl or in the center; around the X spot that the strokes are painted to; and to separate petals/ levels/petal flips/bowls. Study the worksheet. Allow the black background area to show through.
Step 4: Switch to oil color. Shine the surface with Oil Painting Medium. Float Alizarin Crimson and then Paynes Grey to cover the shaded areas. Note the deep shadow in the base of the open bowl, around the X area, and around the outside of the bowl.
Step 5: Brush-mix the Flower Color and paint in a first layer of over-strokes. Fill in the petal shapes with the strokes used in the initial white acrylic undercoat. Begin in the bottom-center and work up and around the flower without reloading the brush. Each stroke should be somewhat deeper in tone than the previous as you pick up the shadow colors on the brush.
Step 6: Lighten the Flower Color with Permalba White to highlight. Study the worksheet. Keep the light in the bottom/front of the flower – that part of the flower that is closest to the center of the floral design. Do not highlight the back/top/outside of the flowers. Do not go over these areas more than once or twice with highlight strokes.
Finish the centers once all of the leaves, buds and flowers are painted. Dot Cadmium Yellow Medium to create a center. Finish with one larger Cadmium Red Light dot.
DECORATIVEPAINTERS.ORG 29
