
Page 2 - How do I Create Dunning Letters
P. 2
Creating Dunning Letters
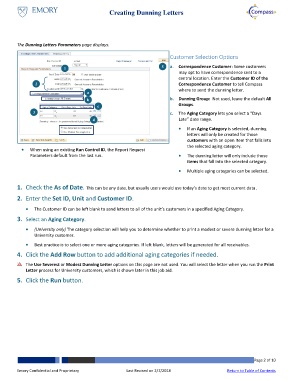
The Dunning Letters Parameters page displays.
Customer Selection Options
1 5 a. Correspondence Customer: Some customers
may opt to have correspondence sent to a
central location. Enter the Customer ID of the
2 Correspondence Customer to tell Compass
a where to send the dunning letter.
b b. Dunning Group: Not used, leave the default All
c Groups.
3 c. The Aging Category lets you select a “Days
4 Late” date range.
If an Aging Category is selected, dunning
letters will only be created for those
customers with an open item that falls into
the selected aging category.
When using an existing Run Control ID, the Report Request
Parameters default from the last run. The dunning letter will only include those
items that fall into the selected category.
Multiple aging categories can be selected.
1. Check the As of Date. This can be any date, but usually users would use today’s date to get most current data.
2. Enter the Set ID, Unit and Customer ID.
The Customer ID can be left blank to send letters to all of the unit’s customers in a specified Aging Category.
3. Select an Aging Category.
(University only) The category selection will help you to determine whether to print a modest or severe dunning letter for a
University customer.
Best practice is to select one or more aging categories. If left blank, letters will be generated for all receivables.
4. Click the Add Row button to add additional aging categories if needed.
The Use Severest or Modest Dunning Letter options on this page are not used. You will select the letter when you run the Print
Letter process for University customers, which is shown later in this job aid.
5. Click the Run button.
Page 2 of 10
Emory Confidential and Proprietary Last Revised on 2/7/2018 Return to Table of Contents