
Page 279 - Kitab3DsMax
P. 279
Chapter 8: Cloning Objects and Creating Object Arrays
Tutorial: Creating instanced doughnuts
Learning how the different clone options work will save you lots of future modifications. To investigate
these options, you’ll take a quick trip to the local doughnut shop.
To clone some doughnuts, follow these steps:
1. Create a doughnut using the Torus primitive by selecting Create ➪ Standard Primitives ➪ Torus,
and then dragging and clicking twice in the Top viewport to create a torus object.
2. Click the torus object in the Top viewport to select it.
3. With the doughnut model selected, click the Select and Move button (or press the W key). Hold
down the Shift key, and in the Top viewport, move the doughnut upward. In the Clone Options
dialog box, select the Instance option, set the Number of Copies to 5, and click OK. Click the
Zoom Extents All (or press the Shift+Ctrl+Z key) button to widen your view.
4. Select all objects with the Edit ➪ Select All (Ctrl+A) command, and then Shift+drag the doughnuts
in the Top viewport to the right. In the Clone Options dialog box, select the Instance option again
and 3 for the Number of Copies and click OK. This creates a nice array of two dozen doughnuts.
Click the Zoom Extents All button (or press the Ctrl+Shift+Z key) to see all the doughnuts.
5. Select a single doughnut, and in the Parameters rollout of the Modify panel, set Radius1 to 20 and
Radius2 to 10.
This makes a nice doughnut and changes all doughnuts at once.
6. Select the Modifiers ➪ Parametric Deformers ➪ Bend command. Then in the Parameters rollout of
the Command Panel, enter 25 in the Angle field and select the X Bend Axis.
This adds a slight bend to the doughnuts.
Cross-Ref
You can use modifiers to alter geometry. You can learn about using modifiers in Chapter 11, “Introducing
Modifiers and Using the Modifier Stack.” n
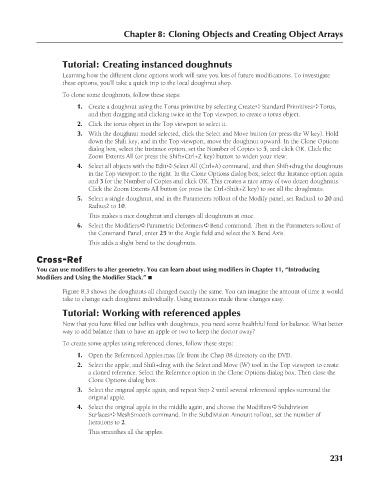
Figure 8.3 shows the doughnuts all changed exactly the same. You can imagine the amount of time it would
take to change each doughnut individually. Using instances made these changes easy.
Tutorial: Working with referenced apples
Now that you have filled our bellies with doughnuts, you need some healthful food for balance. What better
way to add balance than to have an apple or two to keep the doctor away?
To create some apples using referenced clones, follow these steps:
1. Open the Referenced Apples.max file from the Chap 08 directory on the DVD.
2. Select the apple, and Shift+drag with the Select and Move (W) tool in the Top viewport to create
a cloned reference. Select the Reference option in the Clone Options dialog box. Then close the
Clone Options dialog box.
3. Select the original apple again, and repeat Step 2 until several referenced apples surround the
original apple.
4. Select the original apple in the middle again, and choose the Modifiers ➪ Subdivision
Surfaces ➪ MeshSmooth command. In the Subdivision Amount rollout, set the number of
Iterations to 2.
This smoothes all the apples.
231
6/30/10 4:15 PM
14_617779-ch08.indd 231
14_617779-ch08.indd 231 6/30/10 4:15 PM