
Page 348 - Kitab3DsMax
P. 348
Part III: Modeling Basics
The Effect Balance settings include a Bias value, which changes the object between the maximum Axial
Bulge or the maximum Radial Squeeze. The Volume setting increases or decreases the volume of the object
within the modifier’s gizmo.
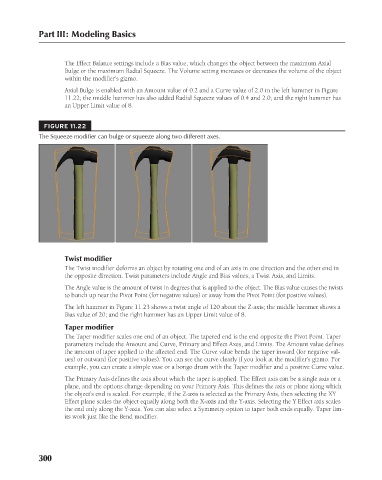
Axial Bulge is enabled with an Amount value of 0.2 and a Curve value of 2.0 in the left hammer in Figure
11.22; the middle hammer has also added Radial Squeeze values of 0.4 and 2.0; and the right hammer has
an Upper Limit value of 8.
FIGURE 11.22
The Squeeze modifier can bulge or squeeze along two different axes.
Twist modifier
The Twist modifier deforms an object by rotating one end of an axis in one direction and the other end in
the opposite direction. Twist parameters include Angle and Bias values, a Twist Axis, and Limits.
The Angle value is the amount of twist in degrees that is applied to the object. The Bias value causes the twists
to bunch up near the Pivot Point (for negative values) or away from the Pivot Point (for positive values).
The left hammer in Figure 11.23 shows a twist angle of 120 about the Z-axis; the middle hammer shows a
Bias value of 20; and the right hammer has an Upper Limit value of 8.
Taper modifier
The Taper modifier scales one end of an object. The tapered end is the end opposite the Pivot Point. Taper
parameters include the Amount and Curve, Primary and Effect Axes, and Limits. The Amount value defines
the amount of taper applied to the affected end. The Curve value bends the taper inward (for negative val-
ues) or outward (for positive values). You can see the curve clearly if you look at the modifier’s gizmo. For
example, you can create a simple vase or a bongo drum with the Taper modifier and a positive Curve value.
The Primary Axis defines the axis about which the taper is applied. The Effect axis can be a single axis or a
plane, and the options change depending on your Primary Axis. This defines the axis or plane along which
the object’s end is scaled. For example, if the Z-axis is selected as the Primary Axis, then selecting the XY
Effect plane scales the object equally along both the X-axis and the Y-axis. Selecting the Y Effect axis scales
the end only along the Y-axis. You can also select a Symmetry option to taper both ends equally. Taper lim-
its work just like the Bend modifier.
300
6/30/10 4:19 PM
18_617779-ch11.indd 300
18_617779-ch11.indd 300 6/30/10 4:19 PM