
Page 502 - Kitab3DsMax
P. 502
Part IV: Materials, Cameras, and Lighting Basics
Cross-Ref
The Material/Map Browser holds all the various material types. The other material types are covered in Chapter
18, “Creating Compound Materials and Using Material Modifiers,” and Chapter 30, “Using Specialized Material
Types.” n
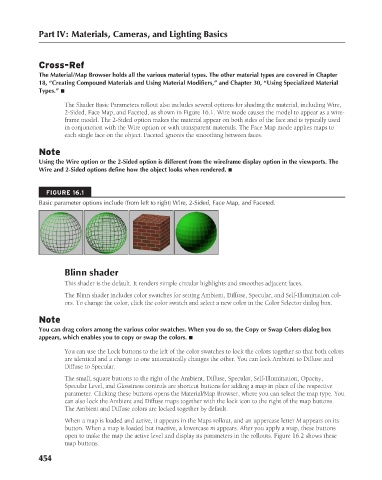
The Shader Basic Parameters rollout also includes several options for shading the material, including Wire,
2-Sided, Face Map, and Faceted, as shown in Figure 16.1. Wire mode causes the model to appear as a wire-
frame model. The 2-Sided option makes the material appear on both sides of the face and is typically used
in conjunction with the Wire option or with transparent materials. The Face Map mode applies maps to
each single face on the object. Faceted ignores the smoothing between faces.
Note
Using the Wire option or the 2-Sided option is different from the wireframe display option in the viewports. The
Wire and 2-Sided options define how the object looks when rendered. n
FIGURE 16.1
Basic parameter options include (from left to right) Wire, 2-Sided, Face Map, and Faceted.
Blinn shader
This shader is the default. It renders simple circular highlights and smoothes adjacent faces.
The Blinn shader includes color swatches for setting Ambient, Diffuse, Specular, and Self-Illumination col-
ors. To change the color, click the color swatch and select a new color in the Color Selector dialog box.
Note
You can drag colors among the various color swatches. When you do so, the Copy or Swap Colors dialog box
appears, which enables you to copy or swap the colors. n
You can use the Lock buttons to the left of the color swatches to lock the colors together so that both colors
are identical and a change to one automatically changes the other. You can lock Ambient to Diffuse and
Diffuse to Specular.
The small, square buttons to the right of the Ambient, Diffuse, Specular, Self-Illumination, Opacity,
Specular Level, and Glossiness controls are shortcut buttons for adding a map in place of the respective
parameter. Clicking these buttons opens the Material/Map Browser, where you can select the map type. You
can also lock the Ambient and Diffuse maps together with the lock icon to the right of the map buttons.
The Ambient and Diffuse colors are locked together by default.
When a map is loaded and active, it appears in the Maps rollout, and an uppercase letter M appears on its
button. When a map is loaded but inactive, a lowercase m appears. After you apply a map, these buttons
open to make the map the active level and display its parameters in the rollouts. Figure 16.2 shows these
map buttons.
454
6/30/10 4:24 PM
24_617779-ch16.indd 454 6/30/10 4:24 PM
24_617779-ch16.indd 454