Page 772 - Kitab3DsMax
P. 772
Part VI: Advanced Modeling
                                      Note
                                      You cannot delete a shape if it is the only shape in the Loft object. n
                                             The Shape Commands rollout also includes six Align buttons for aligning the shape to the Center, Default,
                                             Left, Right, Top, and Bottom. For the Loft object local coordinates, Left and Right move the shape along the
                                             X-axis, and Top and Bottom move it along the Y-axis.
                                             Comparing shapes
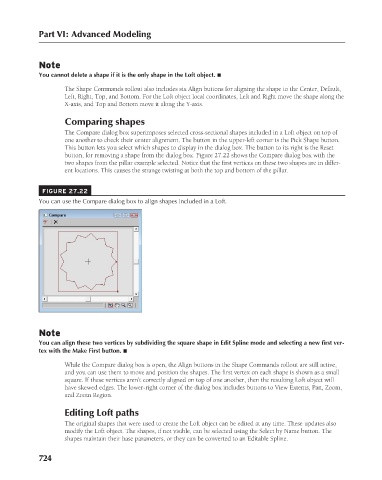
                                             The Compare dialog box superimposes selected cross-sectional shapes included in a Loft object on top of
                                             one another to check their center alignment. The button in the upper-left corner is the Pick Shape button.
                                             This button lets you select which shapes to display in the dialog box. The button to its right is the Reset
                                             button, for removing a shape from the dialog box. Figure 27.22 shows the Compare dialog box with the
                                             two shapes from the pillar example selected. Notice that the first vertices on these two shapes are in differ-
                                             ent locations. This causes the strange twisting at both the top and bottom of the pillar.
                                        FIGURE 27.22
                                      You can use the Compare dialog box to align shapes included in a Loft.


                                      Note
                                      You can align these two vertices by subdividing the square shape in Edit Spline mode and selecting a new first ver-
                                      tex with the Make First button. n
                                             While the Compare dialog box is open, the Align buttons in the Shape Commands rollout are still active,
                                             and you can use them to move and position the shapes. The first vertex on each shape is shown as a small
                                             square. If these vertices aren’t correctly aligned on top of one another, then the resulting Loft object will
                                             have skewed edges. The lower-right corner of the dialog box includes buttons to View Extents, Pan, Zoom,
                                             and Zoom Region.

                                             Editing Loft paths
                                             The original shapes that were used to create the Loft object can be edited at any time. These updates also
                                             modify the Loft object. The shapes, if not visible, can be selected using the Select by Name button. The
                                             shapes maintain their base parameters, or they can be converted to an Editable Spline.


                                      724

