Page 706 - Workshop Manual - Aumark (BJ1051)
P. 706
24-48
                                                  Front axle-fore axle


          Front Axle


          Overhaul


          1.     Removing front wheel and tire assembly (refer to “Chapter 23 Wheels and Tires-Front
                 Wheel and Tire Assembly, Replacement”)
          2.     Removing front wheel hub with brake drum assembly (refer to “Chapter 24 Front
                 Axle-Front Wheel Hub with Brake Drum Assembly, Overhaul”)
          3.     Removing front brake assembly (refer to “Chapter 26 Service Brake-Front Wheel
                 Brake, Overhaul”)
          4.     Removing steering linkage (refer to “Chapter 24 Front Axle-Steering Linkage,
                 Overhaul”)
          5.     Removing steering knuckle (refer to “Chapter 24 Front Axle-Steering Knuckle,
                 Overhaul”)
          6.     Removing front leaf spring U-bolt (refer to “Chapter 21 Front Suspension-Front Leaf
                 Spring Assembly, Overhaul”)
          7.     Removing fore axle

                                                           8.     Checking fore axle
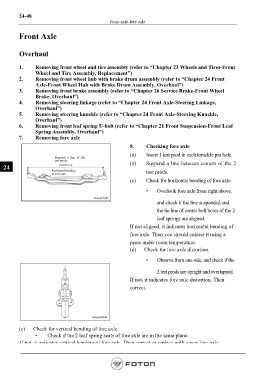
                                                           (a)    Insert 1 test prod in each knuckle pin hole.
                         Suspend  a line of the
                         test prods.                       (b)    Suspend a line between centers of the 2
   24
                        horizontal bending                        test prods.
                        of fore axle
                                                           (c)    Check for horizontal bending of fore axle.

                                                                  •    Overlook fore axle from right above,

                                                                       and check if the line suspended and

                                                                       the tie line of center bolt holes of the 2
                                                                       leaf springs are aligned.
                                                           If not aligned, it indicates horizontal bending of
                                                           fore axle. Then you should correct it using a
                                                           press under room temperature.
                                                           (d)   Check for fore axle distortion.

                                                                  •    Observe from one side, and check if the

                                                                       2 test prods are upright and overlapped.

                                                           If not, it indicates fore axle distortion. Then
                                                           correct.


          (e)   Check for vertical bending of fore axle.
                 •    Check if the 2 leaf spring seats of fore axle are in the same plane.
          If not, it indicates vertical bending of fore axle. Then correct or replace with a new fore axle.


                                                                                                         Page 706

