
Page 32 - fif
P. 32
#
®
ProPex II Apex Locator Error Code Step-by-Step Instructions
®
9 PROPEX II APEX LOCATOR ERROR CODE 6.7 Sound Adjustment
25567_eyal-Y-MK1-837 - 25567_pnim_y-mk1-837_eyal.1.1 | 1 - B | 18-06-11 | 09:03:43 | SR:-- | Magenta
®
25567_eyal-Y-MK1-837 - 25567_pnim_y-mk1-837_eyal.1.1 | 1 - B | 18-06-11 | 09:03:43 | SR:-- | Yellow
ProPex II is equipped with a sonic indicator which enables monitoring
#25567_eyal-Y-MK1-837 - 25567_pnim_y-mk1-837_eyal.1.1 | 1 - B | 18-06-11 | 09:03:43 | SR:-- | Black
25567_eyal-Y-MK1-837 - 25567_pnim_y-mk1-837_eyal.1.1 | 1 - B | 18-06-11 | 09:03:43 | SR:-- | Cyan
None. of the progression of the file within the canal.
This function, in conjunction with the display of progression, enables
10 TROUBLESHOOTING working "blind" while still monitoring the progression of the file.
The volume can be adjusted to one of four levels: mute, low, normal and
Please review the checklist below should you experience a problem high, by successive presses on the volume key.
®
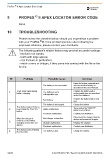
with your ProPex II. If the problem persists after following the
proposed solutions, please contact your distributor.
6.8 Demo Mode
The following patient's related factors may prevent accurate readings:
- blocked root canals; The built-in Demo mode is available to become acquainted with the
- teeth with large apices; device and to demonstrate its operation.
- root fracture or perforation; (1) Disconnect the measuring cable or the charger from the
- metal crowns or bridges, if they come into contact with the file or the device if connected and turn Off the device.
lip clip.
(2) To start Demo Mode, press and hold the (On/Off) button for
about 2 seconds until the second beep sounds and “Demo”
indication appears in the bottom left corner of the display.
N° Problem Possible cause Solution
Open the battery compartment,
The battery is not connected. and connect the battery as
described in the User Manual.
1. Triple beep signal during The battery is not a Replace the battery with a
rechargeable type as described
battery charging.
rechargeable type.
in the User Manual.
Replace the battery with a new
Bad battery.
one.
The battery is discharged. Charge the battery.
The device does not turn on
2. by pressing the “ON / OFF” Button malfunction. Try pressing the “ON/OFF”
button several times.
button.
Electronic malfunction. Contact your distributor.
Disconnect the charger from the
When the charger is Bad charger connection. device and reconnect it again.
3. connected, the battery Charger malfunction. Replace the charger.
charging screen does not
appear.
Electronic malfunction. Contact your distributor.
4. The device shuts off during The battery is low. Charge the battery.
the procedure.
32/184 B EU PIIS DFU PRT / Rev.04 / 02-2018 (Old ZF 1902127.X) B EU PIIS DFU PRT / Rev.04 / 02-2018 (Old ZF 1902127.X) 21/184