
Page 63 - Patty Hahne "The Pocket Guide to Prepper Knots"
P. 63
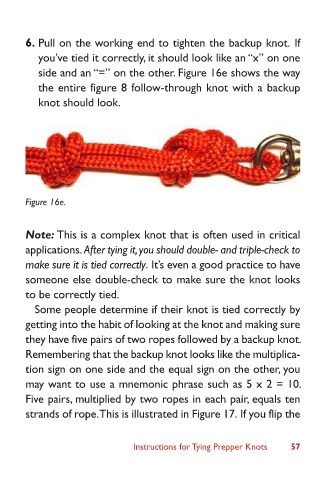
6.  Pull on the working end to tighten the backup knot.  If
              you’ve tied it correctly, it should look like an “x” on one
              side and an “=” on the other. Figure 16e shows the way
              the entire figure 8 follow-through knot with a backup
              knot should look.


            Figure 16e.


            Note: This is a complex knot that is often used in critical
            applications.  After tying it, you should double- and triple-check to
            make sure it is tied correctly.  It’s even a good practice to have
            someone else double-check to make sure the knot looks
            to be correctly tied.
              Some people determine if their knot is tied correctly by
            getting into the habit of looking at the knot and making sure
            they have five pairs of two ropes followed by a backup knot.
            Remembering that the backup knot looks like the multiplica-
            tion sign on one side and the equal sign on the other, you
            may want to use a mnemonic phrase such as 5 x 2 = 10.
            Five pairs, multiplied by two ropes in each pair, equals ten
            strands of rope. This is illustrated in Figure 17.  If you flip the


                                Instructions for Tying Prepper Knots         57