
Page 31 - 3E User Manual- updated 3-2018
P. 31
Time Capture
• This will auto-populate the Task Description field.
• In the Narrative field, type any narrative that needs to appear on the invoice. Clicking in the field will cause it to
expand making it easier to type the narrative.
• Press TAB and the Spell Check feature will be automatically applied. Spell Check is completed the same way as it
is done in Simple Time Entry.
• Press TAB to exit the Narrative field and finish the time entry.
• The hours information for the time entry can be seen in the Calendar and Summary sections.
Additional Time Entries
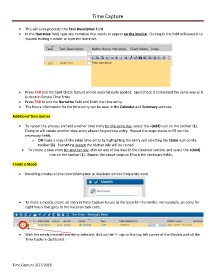
• To repeat the process and add another time entry for the same day, select the +(Add) icon on the toolbar (1).
Doing so will create another time entry above the previous entry. Repeat the steps above to fill out the
necessary fields.
o OR make a copy of the initial time entry by highlighting the entry and selecting the Clone icon on the
toolbar (3). Everything except the Matter info will be cloned.
• To create a time entry for another day, click on one of the days in the Calendar section, and select the +(Add)
icon on the toolbar (1). Repeat the above steps to fill out the necessary fields.
Create a Model
• Modeling creates a time record/template to duplicate entries frequently used.
• To make a model, create an entry in Time Capture to use as the basis for the model. For example, an entry for
eight hours that goes to the Vacation task code.
• With the newly created time entry selected, click on the ‘+’ sign in the top left corner of the Models part of the
Time Capture dashboard.
Time Capture 3/27/2018