
Page 886 - 2006 HARLEY FLSTCI SERVICE MANUAL
P. 886
3-99
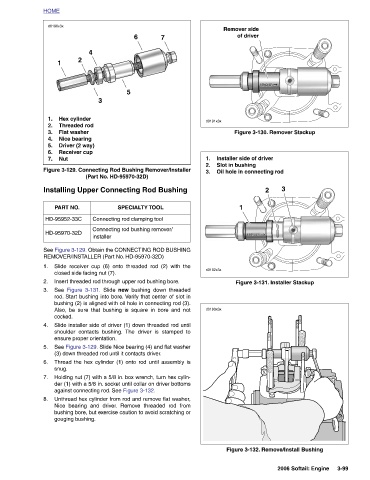
Figure 3-130. Remover Stackup 3 2 Figure 3-131. Installer Stackup Figure 3-132. Remove/Install Bushing 2006 Softail: Engine
Remover side of driver Installer side of driver Slot in bushing Oil hole in connecting rod 1
d0191x3x 1. 2. 3. d0192x3x d0193x3x
Figure 3-129. Connecting Rod Bushing Remover/Installer
7 bushing down threaded The driver is stamped to
(Part No. HD-95970-32D) Installing Upper Connecting Rod Bushing See Figure 3-129. Obtain the CONNECTING ROD BUSHING Insert threaded rod through upper rod bushing bore. Slide new
6 SPECIALTY TOOL Connecting rod bushing remover/
5 Connecting rod clamping tool Slide receiver cup (6) onto threaded rod (2) with the rod. Start bushing into bore. Verify that center of slot in bushing (2) is aligned with oil hole in connecting rod (3). Also, be sure that bushing is square in bore and not Slide installer side of driver (1) down threaded rod until See Figure 3-129. Slide Nice bearing (4) and flat washer Thread the hex cylinder (1) onto rod until assembly is Holding nut (7) with a 5/8 in. box wrench, turn hex cylin- der (1) with a 5/8 in. socket until collar on driver bottoms Unthread hex cylinder from rod and remove flat
3 installer REMOVER/INSTALLER (Part No. HD-95970-32D) (3) down threaded rod until it contacts driver. against connecting rod. See Figure 3-132.
4 closed side facing nut (7). shoulder contacts bushing. ensure proper orientation.
Hex cylinder Threaded rod Flat washer Nice bearing Driver (2 way) Receiver cup PART NO. HD-95952-33C HD-95970-32D cocked. gouging bushing.
2 Figure 3-131.
HOME d0190x3x 1 1. 2. 3. 4. 5. 6. Nut 7. 1. 2. See 3. 4. 5. 6. snug. 7. 8.