
Page 8 - looplibraryfullbook13092018
P. 8
If you need more repeats before hitting record take as many as needed, this will allow
you to get into a groove and splitting the playing and recording into two steps. So let's
try this...
Eventually, you should have a clean loop 2 bars in length with a consistant tempo, playing
over and over with no noticable gaps. If you have, congratulations! You've just
successfully put down the foundation for the rest of the song and created your first
loop!
PART TWO
We can now move onto the next part, this is called 'overdubbing' - where we record the
next part over the top of the previous part(s).
Make sure that you record at the beginning of the loop, if you find yourself lost and not
sure where it is don't worry, just stop the loop and start it again. It will start from the
beginning automatically. Or, if you have made a mistake like a wrong note in the
overdub, you can undo this part and do it again. Each looper has different controls so
consult your manual to find out how to do this on yours.
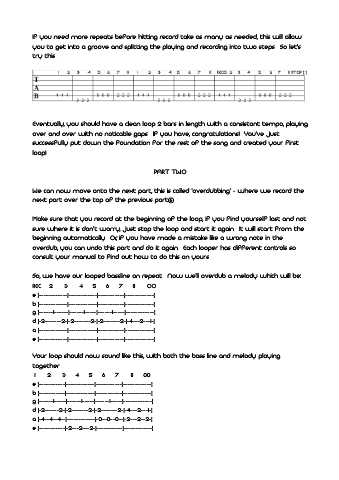
So, we have our looped bassline on repeat. Now we'll overdub a melody which will be:
REC 2 3 4 5 6 7 8 OO
e ¦------------¦------------¦-----------¦------------¦
b ¦------------¦------------¦-----------¦------------¦
g ¦------1------¦------1-----¦------1-----¦------------¦
d ¦-2-------2-¦-2-------2-¦-2-------2-¦-4---2---1-¦
a ¦------------¦------------¦-----------¦------------¦
e ¦------------¦------------¦-----------¦------------¦
Your loop should now sound like this, with both the bass line and melody playing
together.
1 2 3 4 5 6 7 8 00
e ¦-----------¦------------¦-----------¦------------¦
b ¦-----------¦------------¦-----------¦------------¦
g ¦------1-----¦------1-----¦------1-----¦------------¦
d ¦-2------2-¦-2-------2-¦-2-------2-¦-4---2---1-¦
a ¦-4--4--4--¦------------¦-0--0--0--¦-2---2--2-¦
e ¦-----------¦-2---2---2-¦-----------¦------------¦