
Page 1094 - Med Plaza and Cancer Center
P. 1094
4.1 Frontbody Assembly
Chapter 4
4.1 Frontbody Assembly
Tools required: #2 phillips head screwdriver
Removal
You do not have to turn off an outlet’s gas service supply before removing and
servicing the frontbody assembly for pressure gas services. The secondary check
valve and bushing in the rough-in assembly prevents gas flow from the gas service
supply line. (Since medical vacuum, WAGD, and AGSS do not have secondary
checks, temporarily turn off the outlet’s vacuum supply or install the pressure test
cap.)
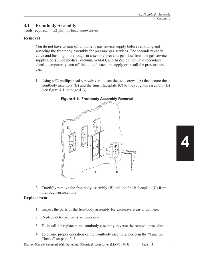
1. Using a #2 phillips head screwdriver, loosen the two screws (A) that secure the
frontbody assembly (B) and the finish faceplate (C) to the rough-in assembly (D)
(see figure 4-1 on page 4–3).
Figure 4-1. Frontbody Assembly Removal
4
2. Carefully remove the frontbody assembly (B) and the finish faceplate (C) from
the rough-in assembly.
Replacement
1. Inspect the parts of the frontbody assembly for excessive wear or damage.
2. Replace defective parts as necessary.
3. To install the replacement frontbody assembly, reverse the removal procedure.
4. To ensure proper operation of the frontbody assembly, perform the “Function
Checks” on page 2–3.
DiamondCare® Recessed Wall Outlet and Electrical Accessories (MAN01-045) Page 4-3