
Page 205 - Womens Pavilion
P. 205
“Oil-Less” Scroll Medical Air
6.0 Inspection/Replacement Procedures
To tighten the V-belts: Check and clean:
1. Check and clean all of the grooves of both the
1. Remove the beltguard.
motor and compressor sheaves.
2. Loosen 4 bolts holding motor.
2. Check the tightness of bolts on the sheave
3. Adjust the two belt tensioning adjustment bushings.
rods on the sliding motor base until the proper
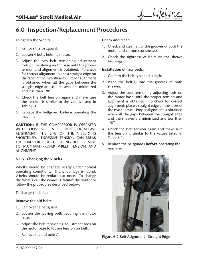
tension and alignment is obtained. To check Installation of new belts:
for correct alignment, place a straight edge on 1. Confi rm the belt type and length.
the faces of the two sheaves. Proper alignment
is obtained when all the gaps between the 2. Place the belt(s) into the grooves of both
straight edge and the sheaves are minimized sheaves.
and less than 1/8”.
3. Adjust the belt tensioning adjusting rods on
4. Check the belt tension again and make sure the motor base until the proper tension and
the tension is similar to the values listed in alignment is obtained. To check for correct
Table 6-1. alignment, place a straight edge on the faces of
the two sheaves. Proper alignment is obtained
5. Replace the beltguard before operating the when all the gaps between the straight edge
machine.
and the sheaves are minimized and less than
1/8”.
CAUTION: IF THE COMPRESSOR IS OPERATED
WITH LOOSE V-BELTS OR IMPROPER SHEAVE 4. Check the belt tension again and make sure
ALIGNMENT, THE LIFE OF THE V-BELTS IS the tension is similar to the values listed in
SHORTENED. EXCESSIVE TENSION CAN BREAK Table 6-1.
THE SHAFT OR REDUCE BEARING LIFE. BE SURE 5. Replace the beltguards before operating the
TO MAINTAIN PROPER V-BELT TENSION AND machine.
ALIGNMENT.
6.1.3 Changing the V-Belts
V-belts should be changed yearly under normal
operating conditions. If any damage is found,
V-belts should be replaced at once. To change
the V-belts call the nearest Lifeline® distributor or
follow the procedures described below:
To change the belts:
Remove the old belts:
1. Remove the beltguard.
2. Loosen the locking bolts securing the motor
base.
3. Adjust the belt tensioning adjustment rods on
the motor base to loosen tension on belts.
4. Remove the old belt(s).
Figure 6.2 Belt Alignment - Straight Edge
4107 9000 69.06 6-2