Page 221 - Womens Pavilion
P. 221

“Oil-Less” Scroll Medical Air


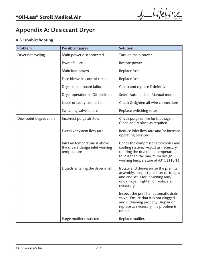
           Appendix A: Desiccant Dryer


           A.3 Troubleshooting

            Problem                    Possible Causes                    Solution
            Dryer not cycling          Main power disconnected            Turn on main power

                                       Power failure                      Restore power

                                       Main fuse blown                    Replace fuse


                                       Fuse blown in control circuit      Replace fuse
                                       Dryer circuit board failure        Check and replace if defective


                                       Dryer operation in Off  position   Select Automatic or Manual mode

                                       Loose or faulty connection         Check & tighten all wire connections

                                       Switching valve failure            Replace switching valve

            Dew point degradation      Incorrect purge air fl ow           Check purge orifi ce for blockage.
                                                                          Clean and replace as required

                                       Excessive system fl ow rate         Reduce inlet fl ow rate and/or increase
                                                                          operating pressure

                                       Inlet air temperature is above     Check the compressor aftercooler and
                                       the dryer’s design inlet working   cooling system.  Adjust as necessary
                                       temperature                        to bring the dryer inlet temperature
                                                                          to less than the maximum design
                                                                          working temperature of 43°C (110°F)

                                       Liquids entering the dryer inlet   Isolate and depressurize the pre-fi lter
                                                                          assembly.  Inspect pre-fi lter cartridges
                                                                          and end seals for loosening and/
                                                                          or damage.  Tighten or replace as
                                                                          necessary.

                                                                          Inspect the pre-fi lter automatic drain
                                                                          valve.  Ensure that it is not clogged
                                                                          and is draining properly.  Repair or
                                                                          replace as necessary, if a problem is
                                                                          noted.

                                       Purge muffl  er restricted         Replace muffl  er.


           4107 9000 69.06                                  A-4
   216   217   218   219   220   221   222   223   224   225   226