Page 21 - ST Sept
P. 21
WELDING                                                                                                  WELDING

 Eddy current weld crack detection  10 ... 15 % compared to the electrical conductivity  and a length of more than 1 mm, located
    of the base metal. The electrical conductivity of B95  at a depth of 1 mm.
    alloys, AMg6 alloys and others can decrease by 15                        Eddy current weld crack detection
    The  physical foundations  of  the  eddy  current   ... 30 %. In the presence of defects such as sticking  can  be  used  to  measure  the  thickness
 weld crack  detection  method  can  be  explained  as   or lack of penetration, the electrical conductivity of  of galvanic, paint and varnish and heat-
 follows. If two inductors L1 and L2 are installed side   the cast core and the base metal are approximately  insulating coatings,  pipe walls, hollow
 by side (for example,  transformers  without cores)   the same.      parts  and  thin-sheet  structures  with
 and a current is passed through the L1 coil (Fig. 1), then when the current strength in it or the      The  method  of  eddy-current  weld crack  one-sided access to them, as well as the
 relative position of the coils changes, an electromotive force will be induced in the L2 coil.  detection has not yet found wide application in the  diameters  of  rods  and  wires.  However,
    In eddy current weld crack detection, the function of one of the inductors is performed by   inspection of  welded seams,  since  the  electrical  in  a  number  of  cases,  the  practical
 a metal plate 1, in which eddy currents 2 are induced (Fig. 2), flowing in the surface layer of the   conductivity  of  individual zones  of  the  seam  and  application  of  this  method  is hampered
 metal from the side of the coil. The density and distribution of eddy currents in a metal depend   the heat-affected zone changes significantly, which  by the inhomogeneity of the properties
 on its geometric and electrophysical parameters.  creates strong interference when detecting welding  of the joint materials and the deviation
    If in the diagram shown in Fig. 2, the metal plate will be replaced with a welded joint   defects.  of the dimensions of the parts from the
 containing defects, then the resistance of the surface layer will increase, which will lead to a   specified ones, even within tolerances.
 weakening of eddy currents, which is recorded by the sensor coil.           Classification     of    energy      field

                                                                      systems. Energy field systems, or eddy
                                                                      current converters (ECC), are subdivided
                                                                      into  external  checkpoint  -  in  which  the
                                                                      coil with  current  covers  the  controlled
                                                                      welded joint (Fig. 4, a), internal bushing
                                                                      - in which the  coil  is inserted  into the
                                                                      joint (Fig. 4, b), and consignment notes
                                                                      - in which the coil is installed on the butt
                                                                      joint (Fig. 4, c). In the ECC of the first
                                                                      two types,  the  electromagnetic  wave
                                                                      from  the  landing system  propagates  in
                                                                      the direction of the controlled connection,
                                                                      and in the ECC of the third type, along its
                                                                      surface.
                                                                             Measuring  coils  (sensors)  are
                                                                      made  separately  from  the  energy  field
                                                                      (generator)  ones  and  are  placed  near
                                                                      the surface of the welded joint. External
                                                                      checkpoints  ECC are  used  to  control
                                                                      linear objects and small parts. With the
                                                                      help of internal bushing ECCs, the inner
                                                                      surface  of  pipes  and  holes  in  various
                                                                      parts  is controlled. Overhead  ECCs  are
                                                                      used mainly for quality control of objects
                                                                      with flat surfaces and objects of complex
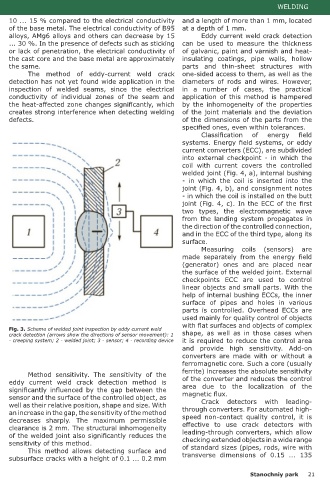
    Fig. 3. Scheme of welded joint inspection by eddy current weld
    crack detection (arrows show the directions of sensor movement): 1   shape,  as  well  as  in those  cases  when
    - creeping system; 2 - welded joint; 3 - sensor; 4 - recording device  it is required to reduce the control area
 Fig. 1. A diagram of two interconnected   Fig. 2. Diagram of the formation of eddy currents in a metal plate: 1   and  provide  high  sensitivity.  Add-on
 inductors L1 and L2: Ф - magnetic flux  - metal plate; 2 - eddy currents; L - inductor; Ф - magnetic flux  converters  are  made  with or  without a
                                                                      ferromagnetic core. Such a core (usually
                                                                      ferrite) increases the absolute sensitivity
            Method  sensitivity. The sensitivity of  the
    Control technique. The inspection process by eddy current weld crack detection (Fig. 3)   eddy  current  weld crack  detection  method  is   of the converter and reduces the control
 includes the following basic operations:  significantly  influenced  by  the  gap  between  the   area  due  to the  localization  of  the
    • external examination of the welded joint and elimination of external defects that impede   sensor and the surface of the controlled object, as   magnetic flux.
 the inspection;  well as their relative position, shape and size. With      Crack  detectors  with leading-
    • installation of the climbing system 1 on the controlled welded joint 2 and passing the   an increase in the gap, the sensitivity of the method   through converters. For automated high-
 current through the excitation coil;  decreases  sharply.  The  maximum  permissible   speed  non-contact  quality  control,  it is
    • scanning the surface of the welded joint with sensor 3 and registering the signal with   clearance is 2 mm. The structural inhomogeneity   effective  to  use  crack  detectors  with
 device 4;  of the welded joint also significantly reduces the        leading-through converters, which allow
    • decoding of control results and evaluation of connection quality.  sensitivity of this method.  checking extended objects in a wide range
    Eddy current testing is used to inspect spot welding of aluminum alloys. In the presence      This method  allows detecting  surface  and   of standard sizes (pipes, rods, wire with
 of a cast core, the electrical conductivity of D16 alloys and Amg alloys in its zone decreases by   subsurface cracks with a height of 0.1 ... 0.2 mm   transverse  dimensions  of  0.15  ...  135


 20  Stanochniy park                                                                            Stanochniy park      21

