Page 22 - ST Sept
P. 22
WELDING                                                                                                                                                                                                                        WELDING

        mm) and small parts (balls and rollers                                                                                   parallel to the surface of the object have been developed to control flat welded joints and joints
        of  bearings,  hardware,  etc.).  At the                                                                                 with a  small surface  curvature.  Crack  detector  EDM-65  is used  to  detect  surface  defects  in
        same time, the inspection productivity                                                                                   cleaned welded seams of aluminum alloys.
        can reach 50 m / s (for wire) or several                                                                                        Scanning crack detectors with a relatively large diameter head are difficult to use for
        thousand  small parts per  hour. The                                                                                     inspection of welded joints of complex configuration. In these cases, portable and small-sized
        performance  of  inspection of  pipes                                                                                    crack detectors with small-diameter converters operating in static mode are usually used. The
        and  rods  is limited by  the  inertia  of                                                                               most common crack detectors of the DNM and VD20NST series. Crack detectors DNM series
        transportation and sorting devices and                                                                                                                              (DNM-15, -500, -2000) are designed to control the surface
        rarely exceeds 3 m / s.                                                                                                                                              quality  of  welded joints made  of  aluminum  and  heat-
               The sensitivity threshold,  the                                                                                                                               resistant  alloys,  and  VD-20NST  allows detecting  surface
        crack detector parameter, determines                                                                                                                                  defects in ferromagnetic and non-ferromagnetic materials.
        the minimum dimensions of a defect                                                                                                                                    For inspection of small parts (mainly bearing parts), crack
        of a given shape, at which the signal-                                                                                                                                detectors  SK-27-MDSh5,  -31,  -39,  MDR-1,  -2  and  -3
        to-noise ratio is two. The  sensitivity                                                                                                                                have been developed for industry purposes. From foreign
        threshold  is usually  set  using a                                                                                                                                    crack detectors of this type, various modifications of the
        calibrated sample with artificial defects                                                                                                                              Tsirkograf  and  Crack  detector  series  developed  at  the
        of  various  shapes,  for  example,                                                                                                                                     Ferster Institute are widespread. Crack detectors of the
        in  the  form  of  holes  of  different                                                                                                                                 "Tsirkograf" series with rotating attachment converters
        diameters  and  depths  in pipes and                                                                                                                                    are  equipped  with replaceable  scanning  heads,  which
        rods, longitudinal marks on the wire,                                                                                                                                   make it possible to control the quality of objects with
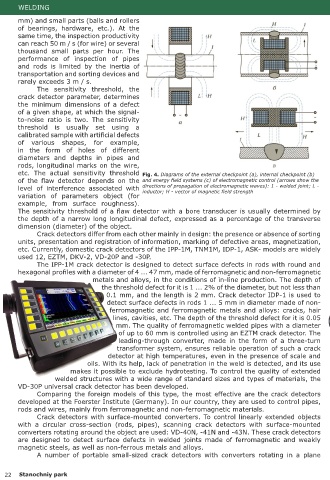
        etc.  The  actual sensitivity  threshold  Fig. 4. Diagrams of the external checkpoint (a), internal checkpoint (b)                                                      a diameter of 2 ... 120 mm. To control short parts and
        of  the  flaw  detector  depends  on  the  and energy field systems (c) of electromagnetic control (arrows show the                                                     assemblies  having a complex surface  of  revolution, a
        level of  interference  associated  with       directions of propagation of electromagnetic waves): 1 - welded joint; L -                                               comb with floating converters, fixed in special holders,
                                                       inductor; H - vector of magnetic field strength
        variation  of  parameters  object  (for                                                                                                                                 is connected to them. Crack detectors of the "Tsirkograf"
        example,  from  surface  roughness).                                                                                                                                    series,  intended  for  inspection  of  the  inner  surface  of
        The sensitivity threshold of a flaw detector with a bore transducer is usually determined by                                                                            pipes, have internal  rotating converters  that  can  be
        the depth of a narrow long longitudinal defect, expressed as a percentage of the transverse                                                                             installed in a  stationary  or  portable  (in the  form  of  a
        dimension (diameter) of the object.                                                                                                                                    hand drill) device.
               Crack detectors differ from each other mainly in design: the presence or absence of sorting
        units, presentation and registration of information, marking of defective areas, magnetization,
        etc. Currently, domestic crack detectors of the IPP-1M, TNM1M, IDP-1, ASK- models are widely
        used 12, EZTM, DKV-2, VD-20P and -30P.
               The IPP-1M crack detector is designed to detect surface defects in rods with round and
        hexagonal profiles with a diameter of 4 ... 47 mm, made of ferromagnetic and non-ferromagnetic
                                    metals and alloys, in the conditions of in-line production. The depth of
                                       the threshold defect for it is 1 ... 2% of the diameter, but not less than
                                         0.1 mm, and the length is 2 mm. Crack detector IDP-1 is used to
                                         detect surface defects in rods 1 ... 5 mm in diameter made of non-
                                          ferromagnetic and ferromagnetic metals and alloys: cracks, hair
                                            lines, cavities, etc. The depth of the threshold defect for it is 0.05
                                             mm. The quality of ferromagnetic welded pipes with a diameter
                                              of up to 60 mm is controlled using an EZTM crack detector. The
                                              leading-through  converter,  made  in  the  form  of  a  three-turn
                                             transformer system, ensures reliable operation of such a crack
                                          detector at high temperatures, even in the presence of scale and
                                  oils. With its help, lack of penetration in the weld is detected, and its use
                            makes it possible to exclude hydrotesting. To control the quality of extended
                      welded structures with a wide range of standard sizes and types of materials, the
        VD-30P universal crack detector has been developed.
               Comparing the foreign models of this type, the most effective are the crack detectors
        developed at the Foerster Institute (Germany). In our country, they are used to control pipes,
        rods and wires, mainly from ferromagnetic and non-ferromagnetic materials.
               Crack detectors with surface-mounted converters. To control linearly extended objects                                                                                                                                      extxe.com
        with  a circular  cross-section (rods, pipes), scanning  crack  detectors  with  surface-mounted
        converters rotating around the object are used: VD-40N, -41N and -43N. These crack detectors
        are  designed  to  detect  surface  defects  in  welded  joints made  of  ferromagnetic  and  weakly
        magnetic steels, as well as non-ferrous metals and alloys.
               A  number  of  portable  small-sized crack  detectors  with  converters  rotating in a  plane


   22   Stanochniy park                                                                                                                                                                                                     Stanochniy park       23

