
Page 516 - PowerPoint Presentation
P. 516
CAVITE STATE UNIVERSITY
T3 CAMPUS
Department of Information Technology ITEC 90 – Network Fundamentals
Week 4: Performing Computer Hardware Services
Objective: After the completion of the chapter, students will be able to:
Disassemble a computer system
Document specifications and information on hardware
Assemble a computer system
Install Input / Output devices
I. Disassembling a Computer
You might be wondering why the lesson starts with disassembly and not assembly
itself? Simply because we want to learn how to disassemble a computer so we can assemble
it again from how we took out the parts.
It is because in the industry, you will be performing disassemble especially in servicing,
compared to building a new computer and repairing and maintaining the computers in the
workplace. You have to be familiar especially first in the system unit.
Preparing for Disassembly
Before going into the disassembly proper, you have to prepare all the materials that
you will need.
Make sure to:
The system unit you will disassemble is UNPLUGGED!
Wear your antistatic wrist strap.
Lay out the antistatic mat.
The table is large and long enough.
Video Disassembly Proper
https://www.youtube.com/watch?v=edWS_IJTyd8&feature=youtu.be
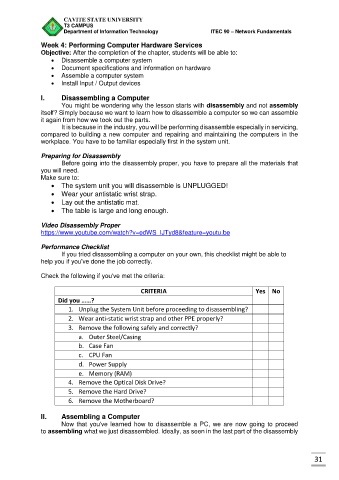
Performance Checklist
If you tried disassembling a computer on your own, this checklist might be able to
help you if you've done the job correctly.
Check the following if you've met the criteria:
CRITERIA Yes No
Did you ……?
1. Unplug the System Unit before proceeding to disassembling?
2. Wear anti-static wrist strap and other PPE properly?
3. Remove the following safely and correctly?
a. Outer Steel/Casing
b. Case Fan
c. CPU Fan
d. Power Supply
e. Memory (RAM)
4. Remove the Optical Disk Drive?
5. Remove the Hard Drive?
6. Remove the Motherboard?
II. Assembling a Computer
Now that you've learned how to disassemble a PC, we are now going to proceed
to assembling what we just disassembled. Ideally, as seen in the last part of the disassembly
31