
Page 19 - Twin Wave Mitter™
P. 19
®
TWIN WAVE MITTER
Installation
Mitter Cloth
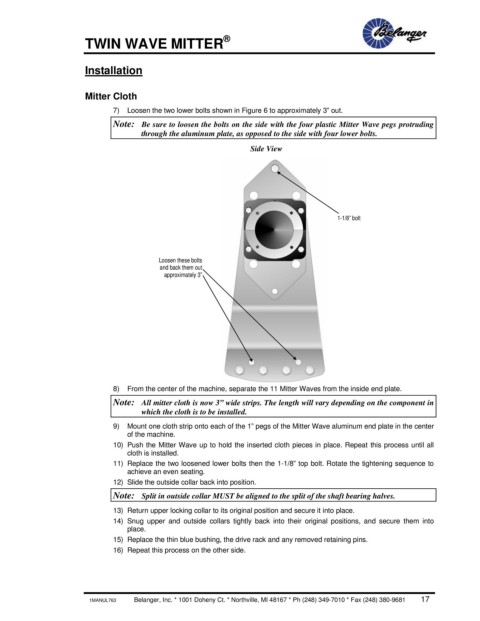
7) Loosen the two lower bolts shown in Figure 6 to approximately 3” out.
Note: Be sure to loosen the bolts on the side with the four plastic Mitter Wave pegs protruding
through the aluminum plate, as opposed to the side with four lower bolts.
Side View
1-1/8” bolt
Loosen these bolts
and back them out
approximately 3”
8) From the center of the machine, separate the 11 Mitter Waves from the inside end plate.
Note: All mitter cloth is now 3” wide strips. The length will vary depending on the component in
which the cloth is to be installed.
9) Mount one cloth strip onto each of the 1” pegs of the Mitter Wave aluminum end plate in the center
of the machine.
10) Push the Mitter Wave up to hold the inserted cloth pieces in place. Repeat this process until all
cloth is installed.
11) Replace the two loosened lower bolts then the 1-1/8” top bolt. Rotate the tightening sequence to
achieve an even seating.
12) Slide the outside collar back into position.
Note: Split in outside collar MUST be aligned to the split of the shaft bearing halves.
13) Return upper locking collar to its original position and secure it into place.
14) Snug upper and outside collars tightly back into their original positions, and secure them into
place.
15) Replace the thin blue bushing, the drive rack and any removed retaining pins.
16) Repeat this process on the other side.
1MANUL763 Belanger, Inc. * 1001 Doheny Ct. * Northville, MI 48167 * Ph (248) 349-7010 * Fax (248) 380-9681 17