
Page 1088 - Wurth Total Catalogue
P. 1088
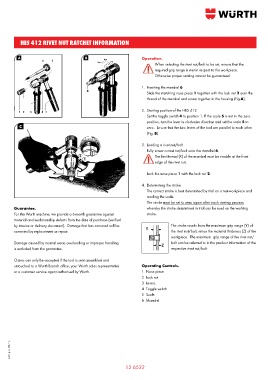
HES 412 RIVET NUT RATCHET INFORMATION


                                                                Operation.
                                                                             When selecting the rivet nut/bolt to be set, ensure that the
                                                                             required grip range is met in respect to the workpiece.
                                                                             Otherwise proper seating cannot be guaranteed.

                                                                1.  Inserting the mandrel 6
                                                                  Slide the matching nose piece 1 together with the lock nut 2 over the
                                                                  thread of the mandrel and screw together in the housing (Fig.A).

                                                                2.  Starting position of the HES 412
                                                                  Set the toggle switch 4 to position 1. If the scale 5 is not in the zero
                                                                  position, turn the lever in clockwise direction and set the scale 5 to
                                                                  zero.  Ensure that the two levers of the tool are parallel to each other
                                                                  (Fig. B).

                                                                3.  Loading a rivet nut/bolt
                                                                   Fully screw a rivet nut/bolt onto the mandrel 6.
                                                                            The first thread (X) of the mandrel must be visable at the front
                                                                      edge of the rivet nut.

                                                                   Lock the nose piece 1 with the lock nut 2.

                                                                4.  Determining the stroke
                                                                  The correct stroke is best determined by trial on a test-workpiece and
                                                                  reading the scale.
                                                                  The stroke must be set to zero again after each riveting process,
       Guarantee.                                                 whereby the stroke determined in trial can be used as the working
       For this Wurth machine, we provide a 6-month guarantee against   stroke.
       material and workmanship defects from the date of purchase (verified
       by invoice or delivery document).  Damage that has occurred will be                                The stroke results from the maximum grip range (Y) of
       corrected by replacement or repair.                                                   the rivet nut/bolt, minus the material thickness (Z) of the
                                                                                             workpiece.  The maximum  grip range of the rivet nut/
       Damage caused by normal wear, overloading or improper handling                                bolt can be referred to in the product information of the
       is excluded from the guarantee.                                                       respective rivet nut/bolt.

       Claims can only be accepted if the tool is sent assembled and
       untouched to a Wurth branch office, your Wurth sales representative   Operating Controls.
       or a customer service agent authorised by Wurth.         1  Nose piece
                                                                2  Lock nut
                                                                3  Levers
                                                                4  Toggle switch
                                                                5  Scale
                                                                6  Mandrel


     AUS. pub. 09/14


                                                         12 6522