
Page 1156 - Adams and Stashak's Lameness in Horses, 7th Edition
P. 1156
1122 Chapter 11
the ground surface of the foot on the affected side,
provide palmar support, and decrease the independent
VetBooks.ir The Repair
vertical movement at the bulbs of the heels.
If the horse must continue in work, a repair should be
performed along with the appropriate farriery. The
objective of the repair is to stabilize the crack distal to
the coronet and promote healing. If a full‐thickness
crack is present, just placing a composite over the defect
generally does not provide stability; an implant should
be used and then covered with a composite patch.
Infection at the origin of the quarter crack is characterized
by marked lameness, pain when pressure is applied to the
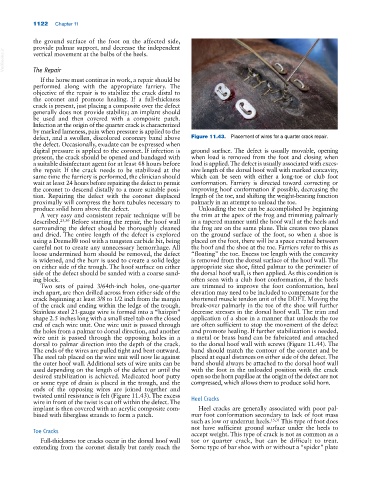
defect, and a swollen, discolored coronary band above Figure 11.43. Placement of wires for a quarter crack repair.
the defect. Occasionally, exudate can be expressed when
digital pressure is applied to the coronet. If infection is ground surface. The defect is usually movable, opening
present, the crack should be opened and bandaged with when load is removed from the foot and closing when
a suitable disinfectant agent for at least 48 hours before load is applied. The defect is usually associated with exces
the repair. If the crack needs to be stabilized at the sive length of the dorsal hoof wall with marked concavity,
same time the farriery is performed, the clinician should which can be seen with either a long‐toe or club foot
wait at least 24 hours before repairing the defect to permit conformation. Farriery is directed toward correcting or
the coronet to descend distally to a more suitable posi improving hoof conformation if possible, decreasing the
tion. Repairing the defect with the coronet displaced length of the toe, and shifting the weight‐bearing function
proximally will compress the horn tubules necessary to palmarly in an attempt to unload the toe.
produce solid horn above the defect. Unloading the toe can be accomplished by beginning
A very easy and consistent repair technique will be the trim at the apex of the frog and trimming palmarly
described. 23,30 Before starting the repair, the hoof wall in a tapered manner until the hoof wall at the heels and
surrounding the defect should be thoroughly cleaned the frog are on the same plane. This creates two planes
and dried. The entire length of the defect is explored on the ground surface of the foot, so when a shoe is
using a Dremel® tool with a tungsten carbide bit, being placed on the foot, there will be a space created between
careful not to create any unnecessary hemorrhage. All the hoof and the shoe at the toe. Farriers refer to this as
loose undermined horn should be removed, the defect “floating” the toe. Excess toe length with the concavity
is widened, and the burr is used to create a solid ledge is removed from the dorsal surface of the hoof wall. The
on either side of the trough. The hoof surface on either appropriate size shoe, fitted palmar to the perimeter of
side of the defect should be sanded with a coarse sand the dorsal hoof wall, is then applied. As this condition is
ing block. often seen with a club foot conformation, if the heels
Two sets of paired 3/64th‐inch holes, one‐quarter are trimmed to improve the foot conformation, heel
inch apart, are then drilled across from either side of the elevation may need to be included to compensate for the
crack beginning at least 3/8 to 1/2 inch from the margin shortened muscle tendon unit of the DDFT. Moving the
of the crack and ending within the ledge of the trough. break‐over palmarly in the toe of the shoe will further
Stainless steel 21‐gauge wire is formed into a “hairpin” decrease stresses in the dorsal hoof wall. The trim and
shape 2.5 inches long with a small steel tab on the closed application of a shoe in a manner that unloads the toe
end of each wire unit. One wire unit is passed through are often sufficient to stop the movement of the defect
the holes from a palmar to dorsal direction, and another and promote healing. If further stabilization is needed,
wire unit is passed through the opposing holes in a a metal or brass band can be fabricated and attached
dorsal to palmar direction into the depth of the crack. to the dorsal hoof wall with screws (Figure 11.44). The
The ends of the wires are pulled tight and bent outward. band should match the contour of the coronet and be
The steel tab placed on the wire unit will now lie against placed at equal distances on either side of the defect. The
the outer hoof wall. Additional sets of wire units can be band should always be attached to the dorsal hoof wall
used depending on the length of the defect or until the with the foot in the unloaded position with the crack
desired stabilization is achieved. Medicated hoof putty open so the horn papillae at the origin of the defect are not
or some type of drain is placed in the trough, and the compressed, which allows them to produce solid horn.
ends of the opposing wires are joined together and
twisted until resistance is felt (Figure 11.43). The excess Heel Cracks
wire in front of the twist is cut off within the defect. The
implant is then covered with an acrylic composite com Heel cracks are generally associated with poor pal
bined with fiberglass strands to form a patch. mar foot conformation secondary to lack of foot mass
such as low or underrun heels. 15,31 This type of foot does
not have sufficient ground surface under the heels to
Toe Cracks accept weight. This type of crack is not as common as a
Full‐thickness toe cracks occur in the dorsal hoof wall toe or quarter crack, but can be difficult to treat.
extending from the coronet distally but rarely reach the Some type of bar shoe with or without a “spider” plate