
Page 117 - Casting of Angels- Dave Parvin
P. 117
113
How to Make a Secondary Mold
by David E. Parvin, A.L.I.
Weather one is trying to derive income from life casting or just wants to produce the highest quality products possible,
being able to make secondary molds is an essential technique. In this, the first of several articles, I will describe how to make
the simplest type of molds, block or pour molds in this case of infants' hands and feet. In the following articles, I will explain
how to make molds of faces, bodies, and multiple hands.
You may be asking why not just cast the infants hands and feet over and over until you have enough copies for
the parents, grandparents, "and his sisters and his cousins and his aunts." (Sorry, Gilbert and Sullivan just pops out
sometimes.) You could, except that for even experienced casters, multiple perfect impressions of wiggly babies' hands
and feet can be problematic. But while allowing one to cast additional copies is the most obvious advantage of
secondary molds, there are several others. The first is that different materials can be used giving the client a variety.
Some of the different materials can not be cast in alginate molds. Also, if the customer realizes later that he/she left
out old, great, rich uncle Bob who just happens to be making a new will and might generously remember the little
tyke with the proper memory jogging gift, you can supply it?
The last advantage may not be quite as obvious, but you will probably get more perfect castings from the
secondary molds. Let us say that your hand and foot had been cast in plaster or something similar. Often there are
imperfections, usually bubbles either in the plaster (innies) or in the alginate (outies) or tips of fingers that are missing
due to trapped air in the mold.
Outies are the easiest to repair since you just trim them off and texture the surface to blend in. Innies and
fingertips are more difficult because you have to add material. It does take some practice before one can sculpt the
last digit of a finger and not have the mother notice. Even if plaster is wet enough for new plaster to be added to old,
there can be a color difference. Paint can cover up a multitude of imperfections but can also cover up some detail such
as fingerprints. I have found that the easiest way to make repairs is using wax or clay. You must wait a few days so
that the plaster will have dried enough that the clay or wax will stick. But of course, wax and clay are different colors
than the plaster and paint will not help here. But if you remold after making repairs, what ever material you use to
cast will all be the same color and the repairs would be hardly noticeable if at all.
Note: one material that does stick to itself wonderfully is Forton MG both plain and with metal powders. Forton
MG can be cast directly in an alginate mold but of course, the mold will most likely be usable only once.
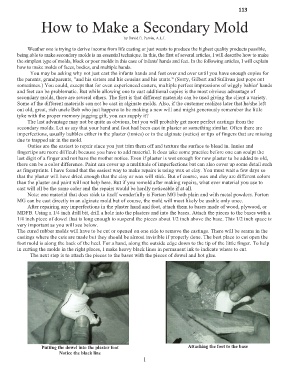
After repairing any imperfections in the plaster hand and foot, attach them to bases made of wood, plywood, or
MDFB. Using a 1/4 inch drill bit, drill a hole into the plasters and into the bases. Attach the pieces to the bases with a
1/4 inch piece of dowel that is long enough to suspend the pieces about 1/2 inch above the base. This 1/2 inch space is
very important as you will see below.
The cured rubber molds will have to be cut or opened on one side to remove the castings. There will be seams in the
castings where the cuts are made but they should be almost invisible if properly done. The best place to cut open the
foot mold is along the back of the heel. For a hand, along the outside edge down to the tip of the little finger. To help
in cutting the molds in the right places, I make heavy black lines in permanent ink to indicate where to cut.
The next step is to attach the pieces to the bases with the pieces of dowel and hot glue.
Putting the dowel into the plaster foot Attaching the foot to the base
Notice the black line
1