
Page 113 - Casting of Angels- Dave Parvin
P. 113
109
of my instructional video on casting the
female torso; not quite subliminal but
shameless none the less.
Removing the clay shouldn’t be
difficult. If a little scraping is
necessary, use something that will not
scratch the inside of the mother mold
since the Forton MG is still new. A
plastic spoon works well. Collect the
removed clay; its weight will provide Photograph #22
away of estimating how much rubber is
required. More on this below. The
easiest way to get the last of the clay
out is to use a brush with hot water and
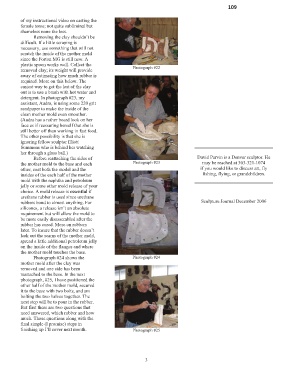
detergent. In photograph #23, my
assistant, Audra, is using some 220 grit
sandpaper to make the inside of the
clean mother mold even smoother.
(Audra has a rather board look on her
face as if reassuring herself that she is
still better off than working in fast food.
The other possibility is that she is
ignoring fellow sculptor Eliott
Summons who is behind her watching
her through a glass ball.)
Before reattaching the sides of David Parvin is a Denver sculptor. He
the mother mold to the base and each Photograph #23 may be reached at 303-321-1074
other, coat both the model and the if you would like to discuss art, fly
insides of the each half of the mother fishing, flying, or grandchildren.
mold with the naphtha and petroleum
jelly or some other mold release of your
choice. A mold release is essential if
urethane rubber is used since urethane
rubbers bond to almost anything. For Sculpture Journal December 2006
silicones, a release isn’t an absolute
requirement but will allow the mold to
be more easily disassembled after the
rubber has cured. More on rubbers
later. To insure that the rubber doesn’t
leak out the seams of the mother mold,
spread a little additional petroleum jelly
on the inside of the flanges and where
the mother mold touches the base.
Photograph #24 shows the Photograph #24
mother mold after the clay was
removed and one side has been
reattached to the base. In the next
photograph, #25, I have positioned the
other half of the mother mold, secured
it to the base with two bolts, and am
bolting the two halves together. The
next step will be to pour in the rubber.
But first there are two questions that
need answered, which rubber and how
much. Those questions along with the
final simple (I promise) steps in
finishing up I’ll cover next month. Photograph #25
3