
Page 110 - Casting of Angels- Dave Parvin
P. 110
106
#2, the three clay bumps about four lock precisely in place. In step #5,
inches apart half way out on the some more threaded metal inserts
Mohawk. These were made by were glued along the centerline of the
adding pieces of clay and shaping as shim. Notice that the ones along the
was step #3, the ridge on the outer Mohawk are closer together than the
edge of the Mohawk that goes the ones on the left side. This is because
full length. The purpose of the bumps the rubber will only be cut apart at
and the ridge was to insure that the the Mohawk and the fit must be more
Mohawk in which the seam will be precise there. Notice also that the
cut fits exactly into the mother mold. holes in the metal inserts have been
Similar bumps and ridge were added plugged with clay. This to prevent
to the other side of the Mohawk. the mother mold material from
Since the mother mold must getting inside and clogging the
separate into two halves along the threads. The bumps, step #6, between
clay strip, the next step,#4, was to the inserts are self sticking clear
provide a barrier or shim so that first plastic dots made by 3M and can be
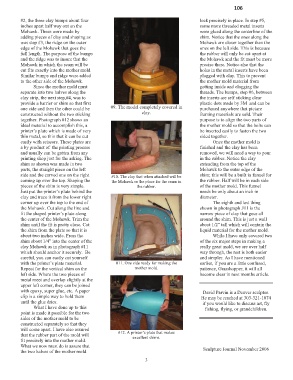
one side and then the other could be #9. The model completely covered in purchased anywhere that picture
constructed without the two sticking clay. framing materials are sold. Their
together. Photograph #12 shows an purpose is to align the two parts of
ideal material to accomplish this, a the mother mold so that the bolts can
printer’s plate which is made of very be inserted easily to fasten the two
thin metal, so thin that it can be cut sided together.
easily with scissors. These plates are Once the mother mold is
a by product of the printing process finished and the clay has been
and usually can be gotten from any removed, we will need a way to pour
printing shop just for the asking. The in the rubber. Notice the clay
shim as shown was made in two extending from the top of the
parts, the straight piece on the left Mohawk to the outer edge of the
side and the curved one on the right #10. The clay that when attached will be shim; this will be a built in funnel for
coming up over the top. Shaping the the Mohawk or the place for the seam in the rubber. Half will be in each side
pieces of the shim is very simple. the rubber. of the mother mold. This funnel
Just put the printer’s plate behind the needs be only about an inch in
clay and trace it from the lower right diameter.
corner up over the top to the end of The eighth and last thing
the Mohawk. Cut along the line and shown in photograph #11 is the
fit the shaped printer’s plate along narrow piece of clay that goes all
the center of the Mohawk. Trim the around the shim. This is just a wall
shim until the fit is pretty close. Cut about 1/2” tall which will contain the
the shim from the plate so that it is liquid material for the mother mold.
about two inches wide. Press the While I have only covered two
shim about 1/4” into the center of the of the six major steps in making a
clay Mohawk as in photograph #11 really great mold, we are over half
which should anchor it securely. Be way through, the rest is both easier
careful, you can easily cut yourself and simpler. As I have mentioned
with the printer’s plate material. #11. One side ready for making the earlier, if you are a little confused,
Repeat for the vertical shim on the mother mold. patience, Grasshopper, it will all
left side. Where the two pieces of become clear in next months article.
metal meet and overlap slightly at the
upper left corner, they can be joined
with epoxy, super glue, etc. A paper David Parvin is a Denver sculptor.
clip is a simple way to hold them He may be reached at 303-321-1074
until the glue dries. if you would like to discuss art, fly
What I have done up to this fishing, flying, or grandchildren.
point is made it possible for the two
sides of the mother mold to be
constructed separately so that they
will come apart. I have also assured
that the rubber part of the mold will #12. A printer’s plate that makes
excellent shims.
fit precisely into the mother mold.
What we now must do is assure that
the two halves of the mother mold Sculpture Journal November 2006
3