
Page 109 - Casting of Angels- Dave Parvin
P. 109
105
insure that when I cut open the mold, thick the clay ( and therefore the
the seam will be where I have rubber) has to be, anywhere from
determined that it will be the least 1/8” to 1/2” will suffice. But I have
obvious. found that it can be difficult to apply
Photograph #2 shows the base the clay without getting some thin
to which the model will be attached places. Also, the model may shift
while the mold is constructed. I have slightly inside the mother mold when
drilled two 5/16” holes into the it’s reattached after removing the
model and inserted dowels that are clay. Therefore, I would suggest that
long enough to attach the model one use clay at least 3/16” until
about 1/2” above the base. This she/he has made a few molds. For
spacing will allow for a small smaller models such as this one, I cut
reservoir to be part of the mold to the clay into strips about two inches
hold excess casting material. (If this wide. Warming the clay will make
doesn’t make any sense, it will later.) #5. The clay “donuts.” the rolling, cutting, and applying
The other four holes, which are 1/4” easier. It is important that the clay
are for attaching what I am holding doesn’t stick to the model. So before
in photograph #3, a 1/4” threaded applying the clay, cover the model
metal insert. While made for wood with plastic wrap. See photograph
working, these inserts are really #8. In this case, the model is plaster
useful in mold making. In and shaping the clay around it isn’t
photograph #4, four inserts have been going to damage it. However, if the
attached to the base by 1X1/2” bolts model is fragile, applying the clay
through the wood. Make sure that the must be done very carefully or,
bolts are long enough to reach the top perhaps, a paint-on mold might be
of the inserts covering all the threads. more appropriate. In photograph #9,
To determine where the holes for the the model has been completely
inserts should be, trace around the #6. The clay “donuts” in place between covered.
the base and the model.
model and drill the holes at least 1/2” Now it is time to give the clay
out from the edge of the model. Drill covered model a “Mohawk.”
enough holes for at least two inserts Because the rubber mold will have to
for each section of the mother mold. be cut open somewhere to remove
Generally, two sections will suffice, the model and the subsequent
however, very complicated shapes castings, every effort must be made
may require more. to have the sides of the cut fit back
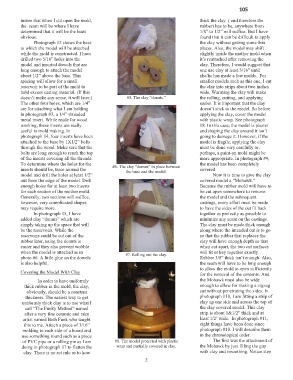
In photograph #5, I have together as perfectly as possible to
added clay “donuts” which are minimize any seam on the castings.
simply taking up the space that will The clay must be made thick enough
be the reservoirs. While the along where the intended cut is to go
reservoirs could be cut out of the so that the rubber that replaces the
rubber later, using the donuts is clay will have enough depth so that
easier and they also prevent wobble when cut apart, the two cut surfaces
when the model is attached as in will fit or key together exactly.
photo #6. A little glue on the dowels #7. Rolling out the clay. Rubber 3/8” thick isn’t enough. Also,
is also helpful. the seam will have to be long enough
to allow the mold to open sufficiently
Covering the Model With Clay for the removal of the contents. And
In order to have uniformly the Mohawk must also be wide
thick rubber in the mold, the clay, enough to allow for making a zigzag
obviously, should be a constant cut without penetrating the sides. In
thickness. The easiest way to get photograph #10, I am fitting a strip of
uniformly thick clay is to use what I clay up one side and across the top of
call “The Funky Method” named the clay covered model. This clay
after a very fine ceramic and raku strip is about 1&1/2” thick and at
artist named Beth Funk who taught least 1/2’ wide. In photograph #11,
this to me. Attach a piece of 3/16” eight things have been done since
molding to each side of a board and photograph #10. I will describe them
use something round such as a piece in the chronological order.
of PVC pipe or a rolling pin as I am #8. The model protected with plastic The first was the attachment of
doing in photograph #7 to flatten the wrap and partially covered in clay. the Mohawk by just filling the gap
clay. There is no set rule as to how with clay and smoothing. Notice step
2