
Page 67 - 233423 - Exhaust Fans_Neat
P. 67
CONVERSION INSTRUCTIONS
MODELS: Z3H, Z5H, Z5S/H, Z8S/H, Z8 GP/GPE, Z81S, Z10S/H & Z10 GP/GPE
RA / TD Ceiling Fan Conversions
RIGHT ANGLE (RA) TO TOP DISCHARGE (TD) CONVERSION
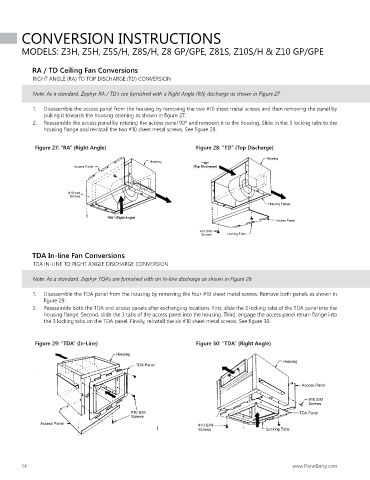
Note: As a standard, Zephyr RA / TD’s are furnished with a Right Angle (RA) discharge as shown in Figure 27.
1. Disassemble the access panel from the housing by removing the two #10 sheet metal screws and then removing the panel by
pulling it towards the housing opening as shown in figure 27.
2. Reassemble the access panel by rotating the access panel 90º and remount it to the housing. Slide in the 3 locking tabs to the
housing flange and reinstall the two #10 sheet metal screws. See figure 28.
Figure 27: “RA” (Right Angle) Figure 28: “TD” (Top Discharge)
Housing
Housing “TD”
Access Panel (Top Discharge)
#10 S/M
Sc rews
Housing Flange
“RA” (Right Angle)
Access Panel
#10 S/M
Screws Locking Tabs
TDA In-line Fan Conversions
TDA IN-LINE TO RIGHT ANGLE DISCHARGE CONVERSION
Note: As a standard, Zephyr TDA’s are furnished with an In-line discharge as shown in Figure 29.
1. Disassemble the TDA panel from the housing by removing the four #10 sheet metal screws. Remove both panels as shown in
figure 29.
2. Reassemble both the TDA and access panels after exchanging locations. First, slide the 3 locking tabs of the TDA panel into the
housing flange. Second, slide the 3 tabs of the access panel into the housing. Third, engage the access panel return flange into
the 3 locking tabs on the TDA panel. Finally, reinstall the six #10 sheet metal screws. See figure 30.
Figure 29: “TDA” (In-Line) Figure 30: “TDA” (Right Angle)
Housing
Housing
TDA Panel
Access Panel
#10 S/M
Screws
#10 S/M TDA Panel
Screws
Access Panel #10 S/M
Screws Locking Tabs
14 www.PennBarry.com